![[Docker] How to Set up Postfix Containers and Send Emails From WordPress in Docker](https://www.wpdiaries.com/wp-content/uploads/2020/07/smtp-150x150.jpg)
![[VirtualBox] Configure an Ubuntu 24.04 / 22.04 Virtual Machine for Web Development (Complete Guide)](https://www.wpdiaries.com/wp-content/uploads/2020/09/local-development-environment-150x150.jpg)


For installing on a bare metal server, skip to section 2 of this article.
If you wish to try installing locally on VirtualBox first, start with section 1 and read forward.
Contents
1. Create an Ubuntu 22.04 Virtual Machine on Oracle VirtualBox
First, you need to create an Ubuntu 22.04 virtual machine. The process is very straightforward and described in this article.
To enable the nested virtualization for a virtual machine on Windows and on macOS:
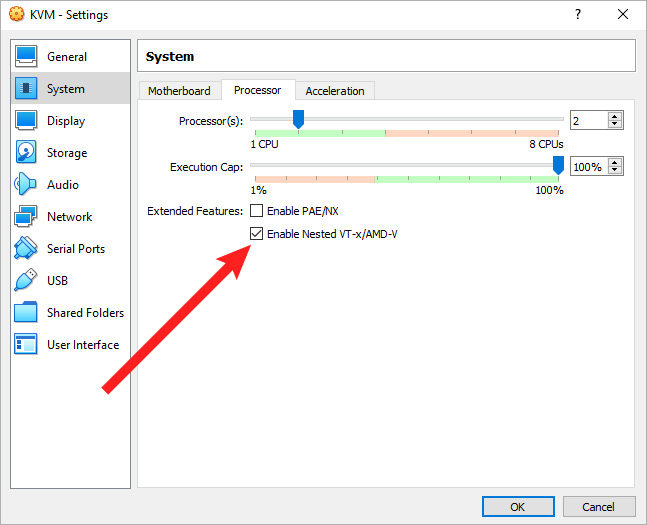
Windows: Go to the virtual machine ![]()
Settings > System and on the tab Processor check the checkbox “Enable Nested VT-x/AMD-V” to enable nested virtualization for the virtual machine.
Also, in ![]()
Settings > Network for your bridged adapter set Promiscuous Mode: Allow All.
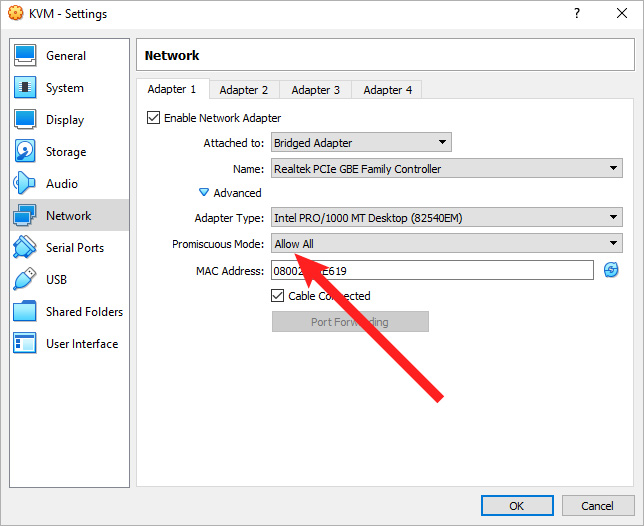
Or your nested virtual machines will have problems with accessing the Internet. And you will have problems with accessing your nested virtual machine by IP in your network (though you would be able to access it by IP from your KVM virtual machine).
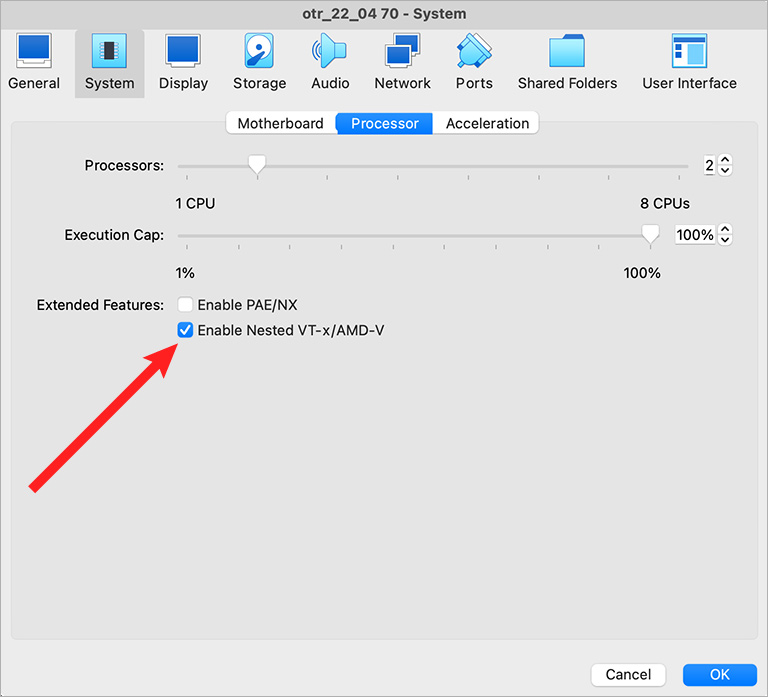
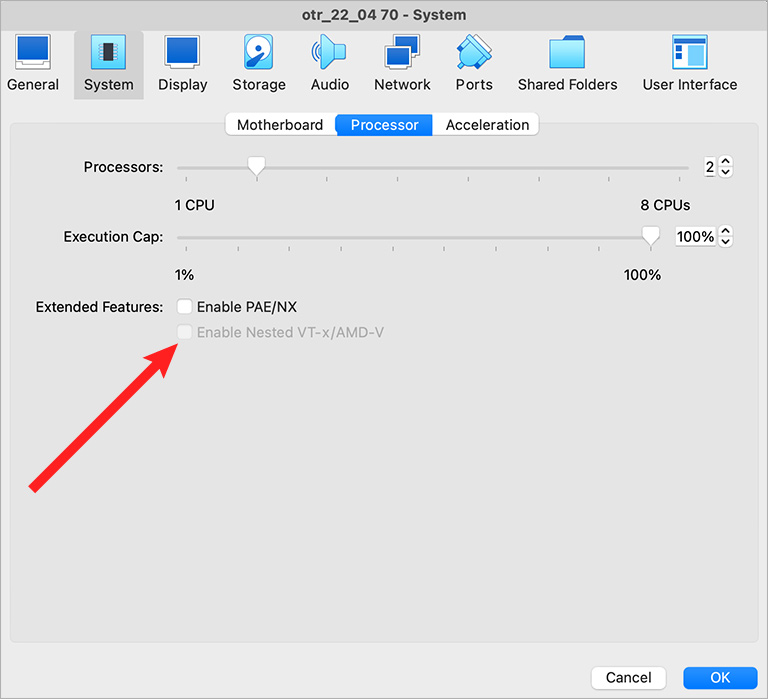
macOS: With your VM selected go to ![]()
Settings > System, go to the tab Processor and check the checkbox “Enable Nested VT-x/AMD-V”:
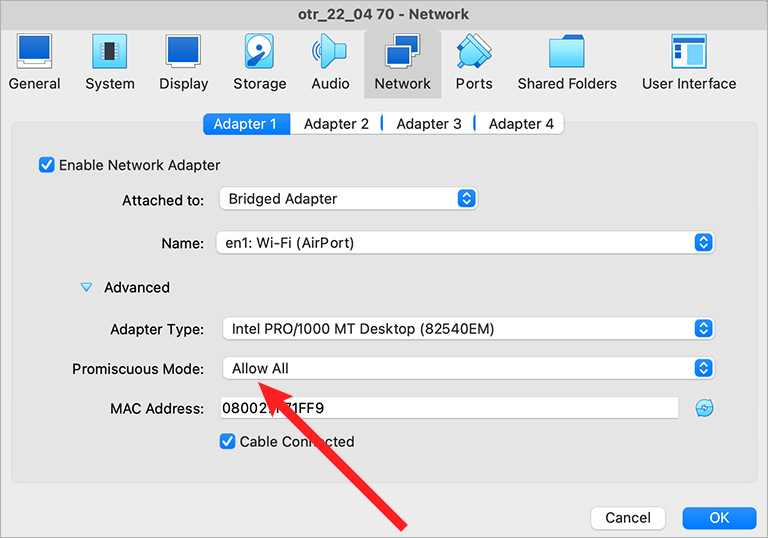
And you can turn the Promiscuous Mode on in the adapter settings in ![]()
Settings > Network:
Please notice: If the checkbox “Enable Nested VT-x/AMD-V” is grayed out on macOS like this:
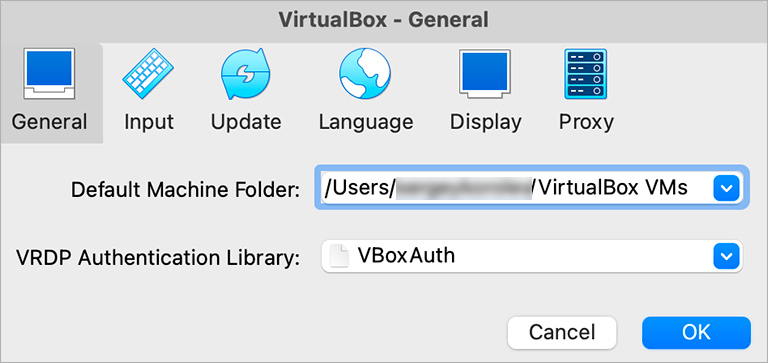
Find out what is the default virtual machine folder in Preferences > General:
Go to your default machine folder in the terminal. And run:
VBoxManage modifyvm <VirtualMachineName> --nested-hw-virt on
For example, if the name of your virtual machine is vm_22 70, run:
VBoxManage modifyvm 'vm_22 70' --nested-hw-virt on
(source)
2. Install KVM packages
On your Ubuntu 22.04 server:
Check that your CPU supports virtualization:
sudo apt install -y cpu-checker
kvm-ok
It should output:
INFO: /dev/kvm exists
KVM acceleration can be used
Install the necessary packages:
sudo apt install -y qemu-kvm virt-manager libvirt-daemon-system virtinst libvirt-clients bridge-utils
(source)
If you are not sure, what each particular package means, use the package search for Ubuntu.
3. Configure Network Interfaces
3.1 Disable the netfilter for bridges
It is recommended.
To disable the netfilter:
1) create /etc/sysctl.d/bridge.conf with the content:
net.bridge.bridge-nf-call-ip6tables=0
net.bridge.bridge-nf-call-iptables=0
net.bridge.bridge-nf-call-arptables=0
2) Create the file /etc/udev/rules.d/99-bridge.rules:
ACTION=="add", SUBSYSTEM=="module", KERNEL=="br_netfilter", RUN+="/sbin/sysctl -p /etc/sysctl.d/bridge.conf"
3) Reboot the system:
reboot
(source)
3.2 Find the MAC address of the network interface enp0s3
You will need it in section 3.3 in the netplan configuration.
To find the MAC address of the NIC (Network Interface Controller) enp0s3, run in the terminal:
ip a show
The MAC address will be in the section link/ether of the enp0s3 network interface description.
Or you could run the command:
lshw -C network
Which will output the MAC address in the “serial:” entry.
Also, see the Ubuntu Network Configuration.
3.3 Add the bridge to netplan
Change the file /etc/netplan/00-installer-config.yaml content to:
network:
  version: 2
#  renderer: networkd
  ethernets:
    enp0s3:
      dhcp4: false
      dhcp6: false
#      addresses: [192.168.1.60/24]
#      nameservers:
#         addresses: [8.8.8.8, 8.8.8.4]
#      routes:
#         - to: default
#           via: 192.168.1.1
  bridges:
    br0:
      dhcp4: false
      dhcp6: false
      interfaces: [ enp0s3 ]
      macaddress: 08:00:27:a1:e6:19
      addresses: [192.168.1.60/24]
      nameservers:
         addresses: [8.8.8.8, 8.8.8.4]
      routes:
         - to: default
           via: 192.168.1.1
      mtu: 1500
      parameters:
        stp: true
        forward-delay: 4
You can also use 0.0.0.0/0 instead of the word “default“.
Please notice: you need to set the macaddress for br0 to the MAC address of enp0s3 you’ve found in section 3.2. It was not necessary on Ubuntu 20.04. But on Ubuntu 22.04 it is necessary. Or the SSH connection to the server will hang right after applying netplan. It’s become necessary after they changed macaddresspolicy in Ubuntu 22.04 to persistent. (source)
See if you have any netplan configuration errors:
sudo netplan generate
To apply the changes:
sudo netplan apply
Please also see this article on configuring KVM on Ubuntu 20.04 machine.
Please notice: Unfortunately, the command normally used for trying a new network configuration:
sudo netplan try
(where changes would be applied temporarily and rolled back unless you pressed Enter within 120 seconds), would not work if you had a bridge configured. You would get a message:
br0: reverting custom parameters for bridges and bonds is not supported
Please carefully review the configuration and use ‘netplan apply’ directly.
So if you are on a bare metal server and your hosting company does not give you IPMI access to the server, you need to be extra careful with your netplan configuration.
Now, if you run
ip a
, you’ll see that the network interface enp0s3 description contains master br0. This means that the NIC (Network Interface Controller) enp0s3 now belongs to br0 (source).
Also, you probably do not need the network interface virbr0. You can delete it:
virsh
net-destroy default
net-undefine default
quit
As a result, the network will be destroyed, the symlink /etc/libvirt/qemu/networks/autostart/default.xml will be deleted and the file /etc/libvirt/qemu/networks/default.xml will be deleted.
You can check that the NIC (Network Interface Controller) virbr0 does not exist:
ip a
3.4 Add the bridge to KVM
Create the file br0.xml with the following content:
<network>
  <name>br0</name>
  <forward mode="bridge"/>
  <bridge name="br0"/>
</network>
The file could be, for example, in your Linux user home directory. If you are under root, it could be, for example, /root/br0.xml
Here:name – the short name of your virtual network. It can be any alpha-numeric string (of course, no 2 networks should have the same name)forward – means our virtual network must be connected to a physical network. mode=”bridge” in our case means we are connecting to a bridge created outside of libvirt.
bridge – determines the name of the bridge to which we are connecting.
Please also see the libvirt documentation for the network XML format.
Please notice: You can use a different name for the XML file name (for example, my-bridge.xml) and for the <name> entry (for example my-bridge). It is not necessary to use br0 – the name of the bridge we configured outside of libvirt.
Run in the terminal (please substitute /path/to/br0.xml with your real Linux path to br0.xml):
sudo virsh
net-define /path/to/br0.xml
net-start br0
net-autostart br0
net-list
quit
Please see the documentation for net-define, net-start, net-autostart, and net-list.
Additional reading: you could also check the following articles:
Now, when KVM was installed, you could proceed to creating Ubuntu 22.04 virtual machines on KVM.
I was goinjg craxzy untill I found your “Disable the netfilter for bridges”….
Thank you, Sergei !
Thank you for your kind comment! I am happy to hear the article was useful.
I don’t know what I would have done if I hadn’t come across your life-saving article. Thank you for your invaluable help.
Thank you so much for your kind words — I’m really glad the article helped!
Great guide! I followed the steps, and it worked flawlessly. The explanations were clear, especially for the network configuration part. Thanks for sharing!
Thank you very much for the good words! I really appreciate them.