![[Docker] How to Set up Postfix Containers and Send Emails From WordPress in Docker](https://www.wpdiaries.com/wp-content/uploads/2020/07/smtp-150x150.jpg)
![[VirtualBox] Configure an Ubuntu 24.04 / 22.04 Virtual Machine for Web Development (Complete Guide)](https://www.wpdiaries.com/wp-content/uploads/2020/09/local-development-environment-150x150.jpg)


We suppose you already have KVM installed. If not, please see this article on installing KVM first.
Contents
Please notice: If you wish to try installing it on your Windows or Mac desktop computer first:
- Install a VirtualBox virtual machine.
- Use the nested virtualization, installing KVM on a VirtualBox virtual machine.
- Follow the steps below to install an Ubuntu 22.04 virtual machine on KVM.
To install an Ubuntu 22.04 virtual machine on KVM:
1. Download the Ubuntu 22.04 Image
sudo su
cd /var/lib/libvirt/images
wget https://releases.ubuntu.com/22.04.1/ubuntu-22.04.1-live-server-amd64.iso
Please notice: You’ll need 2 options for the virt-install command below: kernel and initrd.
To find them: Mount the downloaded iso image to a directory:
mount /var/lib/libvirt/images/ubuntu-22.04.1-live-server-amd64.iso /mnt
and then check the contents of the directory /mnt.
- You’ll see the file
casper/vmlinuz. You’ll need it in thekerneloption of the commandvirt-installin section 2. - And there’ll be a file
casper/initrd. You’ll need it in theinitrdoption in section 2.
Write down the paths/names of these 2 files.
Now you can unmount your mount point:
umount /mnt
2. Create the Virtual Machine
Run in the terminal:
sudo virt-install --name vm61 \
--os-variant ubuntu22.04 \
--vcpus 1 \
--memory 2048 \
--location /var/lib/libvirt/images/ubuntu-22.04.1-live-server-amd64.iso,kernel=casper/vmlinuz,initrd=casper/initrd \
--network bridge=br0,model=virtio \
--disk size=20 \
--graphics none \
--extra-args='console=ttyS0,115200n8 --- console=ttyS0,115200n8' \
--debug
, where
--name– is the name of the virtual machine (VM).
(normally I name VMs after their static IP addresses. So the name vm61 will correspond to the IP 192.168.1.61)--vcpus– number of vCPUs--memory– RAM allocated to the VM--location– path to the local .iso file (or a distro install URL). Also, we setkernelandinitrdhere (we got values for them in section 1).--disk– hard disk allocated to the VM (20GB in our case).--extra-args– extra arguments. In our case, we are setting the console configuration. But, for example, you can configure a static IP for the VM with this.--debug– debugging information will be output during the installation. Remove this option if you do not need it.--os-variant– is an operating system installed on the VM. For the full list of supported values, run:
virt-install --osinfo list
Or you could get more information like this ( but it would require installing an additional package libosinfo-bin):
apt install libosinfo-bin
osinfo-query os
(source)
For detailed help on virt-install run:
man virt-install
or you could see it online here.
For brief help run:
virt-install -h
Also, you could find this discussion on virt-install usage useful.
After you’ve started virt-install, it could be that the installer will not be able to configure the network automatically.
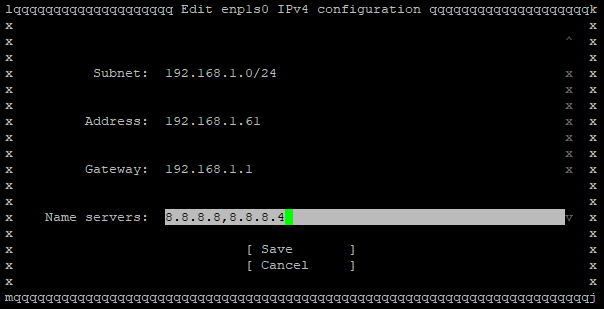
In my case: I was on the network 192.168.1.0/24. My router (=gateway) IP was 192.168.1.1. And I wanted my VM to have the static IP 192.168.1.61.
So when I was asked to configure the network, I entered those details manually:
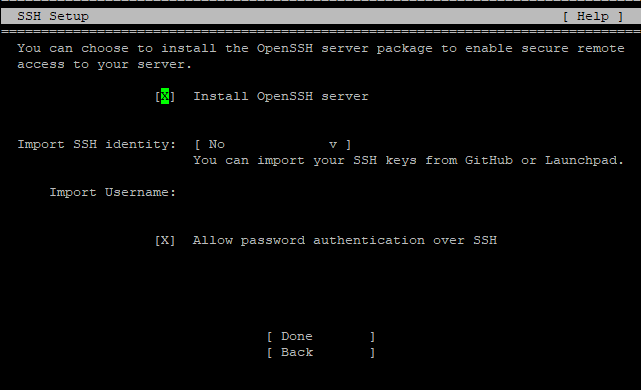
Also, I’ve chosen to install the OpenSSH server during the installation:
If you are installing the virtual machine on KVM which is, in turn, running on VirtualBox with nested virtualization, the installation process could take pretty long (it took more than 1 hour for me).
Later, you’ll be able to edit the virtual machine’s initial configuration parameters with
sudo virsh edit vm61
(replace vm61 with your virtual machine name)
If your virtual machine was shut down, you can start it with
virsh start vm61 --console
Right after the installation, the file /etc/netplan/00-installer-config.yaml on the my nested virtual machine (vm61) looked like this:
# This is the network config written by 'subiquity'
network:
  ethernets:
    enp1s0:
      addresses:
      - 192.168.1.61/24
      gateway4: 192.168.1.1
      nameservers:
        addresses:
        - 8.8.8.8
        - 8.8.8.4
        search: []
  version: 2
So the nested VM was on the same network as the KVM machine. It had access to the Internet. And was accessible by IP on the network.
Also, see this, this, and this sections of the libvirt Networking documentation.
For Ubuntu/Debian networking please see this article. You could also look at this wiki article on networking.
Thank you, works like a charm 🙂
I am really glad to hear this. Thanks for the good words!
very nicely documented for newbies like me.
felt great after going through the diaries.
Thank you a lot.
Thank you very much for such a good comment! I am very glad to hear the article was useful.
Thank you very much
Thanks for your comment!