![[Docker] How to Set up Postfix Containers and Send Emails From WordPress in Docker](https://www.wpdiaries.com/wp-content/uploads/2020/07/smtp-150x150.jpg)
![[VirtualBox] Configure an Ubuntu 24.04 / 22.04 Virtual Machine for Web Development (Complete Guide)](https://www.wpdiaries.com/wp-content/uploads/2020/09/local-development-environment-150x150.jpg)

It is intended for the development environment only. Please do not use this in a production environment. Please use the official Docker WordPress image on production instead.
This article describes how to add Xdebug to the official Docker WordPress image. You can see the resulting image on Docker Hub. Also, you can see the project on GitHub.
For WordPress with Xdebug, you can build the required image from the source (recommended). Or you can use a ready-made image.
In the end, we’ll consider how to separate configurations for the production and development environments using multiple compose files. And how to add PHP extensions to your WordPress image if necessary.
Please notice: If you do not need Xdebug but need a simple development environment to quickly check WordPress themes and plugins, please see the article on using the official Docker WordPress image for testing themes and plugins locally instead.
Contents
Before running the examples, you would need to install Docker.
1. Building an Image
To build an image, go to the directory, where your compose.yaml is located, and clone the Git repository:
git clone https://github.com/wpdiaries/wordpress-xdebug.git xdebug
This will clone the Git repository wpdiaries/wordpress-xdebug to the subfolder xdebug.
We give 2 examples of Xdebug configuration below:
- Xdebug 3 – the newest version of Xdebug (at the time of writing). Works both with PHP 8 and with some versions below it, e.g. PHP 7.4.
- Xdebug 2 – the previous version of Xdebug. Incompatible with PHP 8. Works with older versions of PHP (e.g. PHP 7).
Please notice: The easiest way to understand all this and start working with the code is to clone this project from GitHub.
Xdebug 3
For Xdebug 3, the Dockerfile of the cloned project will look like this:
FROM wordpress:6.7.2-php8.4-apache

# Install packages under Debian
RUN apt-get update && \
    apt-get -y install git

# Install Xdebug from source as described here:
# https://xdebug.org/docs/install
# Available branches of Xdebug could be seen here:
# https://github.com/xdebug/xdebug/branches
RUN cd /tmp && \
    git clone https://github.com/xdebug/xdebug.git && \
    cd xdebug && \
    git checkout xdebug_3_4 && \
    phpize && \
    ./configure --enable-xdebug && \
    make && \
    make install && \
    rm -rf /tmp/xdebug

# Copy xdebug.ini to /usr/local/etc/php/conf.d/
COPY files-to-copy/ /

# Since this Dockerfile extends the official Docker image `wordpress`,
# and since `wordpress`, in turn, extends the official Docker image `php`,
# the helper script docker-php-ext-enable (defined for image `php`)
# works here, and we can use it to enable xdebug:
RUN docker-php-ext-enable xdebug
In this Dockerfile, you can replace the first line with e.g.
FROM wordpress
to build on the latest version of the image wordpress. Or you can add the tag you need (like we added 6.7.2-php8.4-apache above). To build on some particular version of the image.
Please notice: In the Dockerfile above you need to use compatible versions of Xdebug and PHP. The branch xdebug_3_4 of Xdebug is compatible with PHP of the image wordpress:6.7.2-php8.4-apache.
But if, for example, you tried to use the image wordpress:6.1.1-php8.2-apache with the branch xdebug_3_0 of Xdebug, you would get the following error while building the image:
checking Check for supported PHP versions… configure: error: not supported. Need a PHP version >= 7.2.0 and < 8.1.0 (found 8.1.7)
Your folder files-to-copy will contain a subfolder usr/local/etc/php/conf.d/ with the file xdebug.ini:
; Parameters description could be found here: https://xdebug.org/docs/step_debug#configure
; Also, for PhpStorm, configuration tips could be found here: https://www.jetbrains.com/help/phpstorm/configuring-xdebug.html
zend_extension=xdebug.so
xdebug.mode=debug
; the default port for Xdebug 3 is 9003, not 9000
xdebug.client_port=9003
; The line below is commented. This is the IP of your host machine, where your IDE is installed.
; We set this IP via XDEBUG_CONFIG environment variable in compose.yaml instead.
;xdebug.client_host=192.168.1.2
Please notice: If your WordPress project is located in a folder on your macOS or Windows computer and shared to an Ubuntu virtual machine using Oracle VirtualBox Guest Additions, and if your project is running inside a Docker container on that virtual machine, your Dockerfile could be a little bit more complicated. It sounds not easy. But actually, it is pretty straightforward. And I often use this setup for local development.
Your compose.yaml file can look like this now:
services:

  wordpress:
    container_name: wordpress-wpd
    restart: always
    build:
      dockerfile: Dockerfile # this line is actually redundant here - you need it only if you want to use some custom name for your Dockerfile
      context: ./xdebug # a path to a directory containing a Dockerfile, or a URL to a git repository.

    ports:
      - "80:80"

    environment:
      VIRTUAL_HOST: mydomain.com, www.mydomain.com
      WORDPRESS_DB_HOST: db
      WORDPRESS_DB_NAME: mydbname
      WORDPRESS_DB_USER: mydbuser
      WORDPRESS_DB_PASSWORD: mydbpassword
      # Set the XDEBUG_CONFIG as described here: https://xdebug.org/docs/all_settings#XDEBUG_CONFIG
      XDEBUG_CONFIG: client_host=192.168.1.2 # This is for XDebug 3. For XDebug 2, we should use remote_host instead of client_host.

    depends_on:
      - db

    volumes:
      - /opt/projects/wpd/www:/var/www/html

    extra_hosts:
      - "test1.com:192.168.1.88" # Replace test1.com with your local test domain name
      - "www.test1.com:192.168.1.88" # Replace test1.com with your local test domain name

    networks:
      - backend-wpd
      - frontend-wpd


  db:
    container_name: mysql-wpd
    image: mysql:8.3.0
    command: --default-authentication-plugin=mysql_native_password
    restart: always

    environment:
      MYSQL_ROOT_PASSWORD: mydbrootpassword
      #MYSQL_RANDOM_ROOT_PASSWORD: '1' # You can use this instead of the option right above if you do not want to be able to login to MySQL under root
      MYSQL_DATABASE: mydbname
      MYSQL_USER: mydbuser
      MYSQL_PASSWORD: mydbpassword

    ports:
      -  "3306:3306" # I prefer to keep the ports available for external connections in the development environment to be able to work with the database
                     # from programs like e.g. HeidiSQL on Windows or DBeaver on Mac.

    volumes:
      - /opt/projects/wpd/mysql:/var/lib/mysql

    networks:
      - backend-wpd


networks:
  frontend-wpd:
  backend-wpd:
Of course, you need to set parameters like database name, user, password, etc. to your own values here.
Please notice:
1. The variable XDEBUG_CONFIG is an Xdebug environment variable. This variable is described in detail in the Xdebug official documentation.
With XDEBUG_CONFIG you can set the host machine IP address right in compose.yaml (instead of doing it in the file xdebug.ini).
For Xdebug 3 it would be:
XDEBUG_CONFIG: client_host=192.168.1.2 # change 192.168.1.2 to the IP of your host machine
For Xdebug 2 (described below) it would be:
XDEBUG_CONFIG: remote_host=192.168.1.2 # change 192.168.1.2 to the IP of your host machine
Of course, you need to change the IP 192.168.1.2 to the IP of the host machine where your IDE (e.g. PhpStorm or NetBeans) is installed.
2. You can see that we have port 3306 open here for external connections. This will allow us to work with the database from programs like e.g. HeidiSQL on Windows or DBeaver on Mac. Of course, we would never do anything like that in the production environment. But this configuration is intended for the development environment only.
3. The directive extra_hosts is necessary in your test environment for local IP resolution inside the Docker container. It adds the corresponding lines to the file hosts inside the Docker container.
Without this directive, you might have problems with locally installed themes or plugins.
Please see the detailed explanation of why this directive is necessary in the local development environment.
After all these changes, if you run the compose.yaml with
docker compose up -d
, you’ll get the WordPress + Xdebug and MySQL containers up and running.
Please notice: If you have an old version of Docker, the command docker compose may not be available to you. In this case, you would need to install docker-compose. And use the command “docker-compose” in place of “docker compose” in the Linux terminal. Also, you may need to rename your compose.yaml files into docker-compose.yml files.
Still, if you install a modern version of Docker, the command “docker compose” will be available to you without installing additional packages.
If you need to rebuild the WordPress image for any reason (for example, you’ve changed the version of wordpress in the Dockerfile), you could run the command:
docker compose up -d --build
This would rebuild the WordPress with Xdebug image and relaunch the container.
Xdebug 2
Few people could be interested in Xdebug 2 nowadays. Still, if you need it for some reason:
Please click to open
If you wish to use Xdebug 2, you can not use PHP 8 (you’ll get a compatibility error). You’ll need to use the previous version of the standard WordPress Docker image to build on. So, below we build on wordpress:6.1.1-php7.4-apache rather than wordpress:6.7.2-php8.4-apache. Also, we are using xdebug_2_9 instead of xdebug_3_4. The Dockerfile will look like this:
FROM wordpress:6.1.1-php7.4-apache

# Install packages under Debian
RUN apt-get update && \
    apt-get -y install git

# Install Xdebug from source as described here:
# https://xdebug.org/docs/install
# Available branches of Xdebug could be seen here:
# https://github.com/xdebug/xdebug/branches
RUN cd /tmp && \
    git clone https://github.com/xdebug/xdebug.git && \
    cd xdebug && \
    git checkout xdebug_2_9 && \
    phpize && \
    ./configure --enable-xdebug && \
    make && \
    make install && \
    rm -rf /tmp/xdebug

# Copy xdebug.ini to /usr/local/etc/php/conf.d/
COPY files-to-copy/ /

# Since this Dockerfile extends the official Docker image `wordpress`,
# and since `wordpress`, in turn, extends the official Docker image `php`,
# the helper script docker-php-ext-enable (defined for image `php`)
# works here, and we can use it to enable xdebug:
RUN docker-php-ext-enable xdebug
For Xdebug 2, the file xdebug.ini inside the folder files-to-copy/usr/local/etc/php/conf.d/ will look like this:
; Parameters description could be found here: https://xdebug.org/docs/step_debug#configure
; Also, for PhpStorm, configuration tips could be found here: https://www.jetbrains.com/help/phpstorm/configuring-xdebug.html
zend_extension=xdebug.so
xdebug.remote_enable=1
xdebug.remote_port=9000
; The line below is commented. This is the IP of your host machine, where your IDE is installed.
; We set this IP via XDEBUG_CONFIG environment variable in compose.yaml instead.
;xdebug.remote_host=192.168.1.2
The file compose.yaml could be the same for Xdebug 2 as for Xdebug 3 (see the section right above).
2. Using a Ready-made Image
If you do not want to build anything but prefer to use a prebuilt image, some images are available to you at wpdiaries/wordpress-xdebug.
Tags of ready-made images for wpdiaries/wordpress-xdebug on Docker Hub are the same as the corresponding tags of the official Docker WordPress image.
For example, wpdiaries/wordpress-xdebug:6.7.2-php8.4-apache means that the image has been created based on the image wordpress:6.7.2-php8.4-apache.
But I do not build all possible tags, so please check the list of available tags of wpdiaries/wordpress-xdebug.
To use the image with docker compose, you do not need to clone any project from the git repository. But you’ll need to replace the following lines in the compose.yaml from the previous example:
    build:
      dockerfile: Dockerfile
      context: ./xdebug
with e.g.
image: wpdiaries/wordpress-xdebug:6.7.2-php8.4-apache
In this case the complete compose.yaml will look like this:
services:

  wordpress:
    container_name: wordpress-wpd
    restart: always
    image: wpdiaries/wordpress-xdebug:6.7.2-php8.4-apache

    ports:
      - "80:80"

    environment:
      VIRTUAL_HOST: mydomain.com, www.mydomain.com
      WORDPRESS_DB_HOST: db
      WORDPRESS_DB_NAME: mydbname
      WORDPRESS_DB_USER: mydbuser
      WORDPRESS_DB_PASSWORD: mydbpassword
      # Set the XDEBUG_CONFIG as described here: https://xdebug.org/docs/all_settings#XDEBUG_CONFIG
      XDEBUG_CONFIG: client_host=192.168.1.2 # change 192.168.1.2 to the IP of your host machine

    depends_on:
      - db

    volumes:
      - /opt/projects/wpd/www:/var/www/html

    extra_hosts:
      - "test1.com:192.168.1.88" # Replace test1.com with your local test domain name
      - "www.test1.com:192.168.1.88" # Replace test1.com with your local test domain name

    networks:
      - backend-wpd
      - frontend-wpd


  db:
    container_name: mysql-wpd
    image: mysql:8.3.0
    command: --default-authentication-plugin=mysql_native_password
    restart: always

    environment:
      MYSQL_ROOT_PASSWORD: mydbrootpassword
      #MYSQL_RANDOM_ROOT_PASSWORD: '1' # You can use this instead of the option right above if you do not want to be able to login to MySQL under root
      MYSQL_DATABASE: mydbname
      MYSQL_USER: mydbuser
      MYSQL_PASSWORD: mydbpassword

    ports:
      -  "3306:3306" # I prefer to keep the ports available for external connections in the development environment to be able to work with the database
                     # from programs like e.g. HeidiSQL on Windows or DBeaver on Mac.

    volumes:
      - /opt/projects/wpd/mysql:/var/lib/mysql

    networks:
      - backend-wpd


networks:
  frontend-wpd:
  backend-wpd:
Now if you run the compose.yaml with
docker compose up -d
, you’ll get the WordPress + Xdebug container and the MySQL container up and running. No building, in this case, is necessary.
Here, the same as in the first example, we have ports 80 (for the HTTP server) and 3306 (for the MySQL server) open for incoming connections.
Of course, this also should be used in the development environment only. And should never be used in production.
3. Configuring PhpStorm
If you write your PHP code in PhpStorm, here are a few brief tips on configuring the debugger in this IDE.
First, you can install the Xdebug browser extension. I usually debug from Chrome so I use the Google Chrome extension. But extensions for other browsers also exist. Please see this PhpStorm documentation page for the list of extensions you can use.
The browser extensions were created by 3rd party developers. You can see the source code for the Chrome browser extension on GitHub here.
Now, before you start debugging, you need to set a breakpoint in PhpStorm (by clicking on the corresponding line on the left of your code in the IDE).
Also, you’ll need to map the remote file path to your root directory at the server to the file path in your local file system. To do that in the most recent versions of PhpStorm (for older versions, please see the note below) you’ll need to go to:
macOS: PhpStorm > Preferences > PHP > Servers
Windows: File > Settings > PHP > Servers
and set the file mapping. In my case (the IDE is installed on a Mac, and the project is deployed under Ubuntu on an Oracle VirtualBox virtual machine), the WordPress installed in the folder www. And in the Docker container, the root directory for WordPress is /var/www/html. So I had to set mapping from www to /var/www/html so that PhpStorm knew which directory inside the Docker container corresponded to the root directory of the project. E.g. for wpdiaries.com, the settings window would look similar to this:
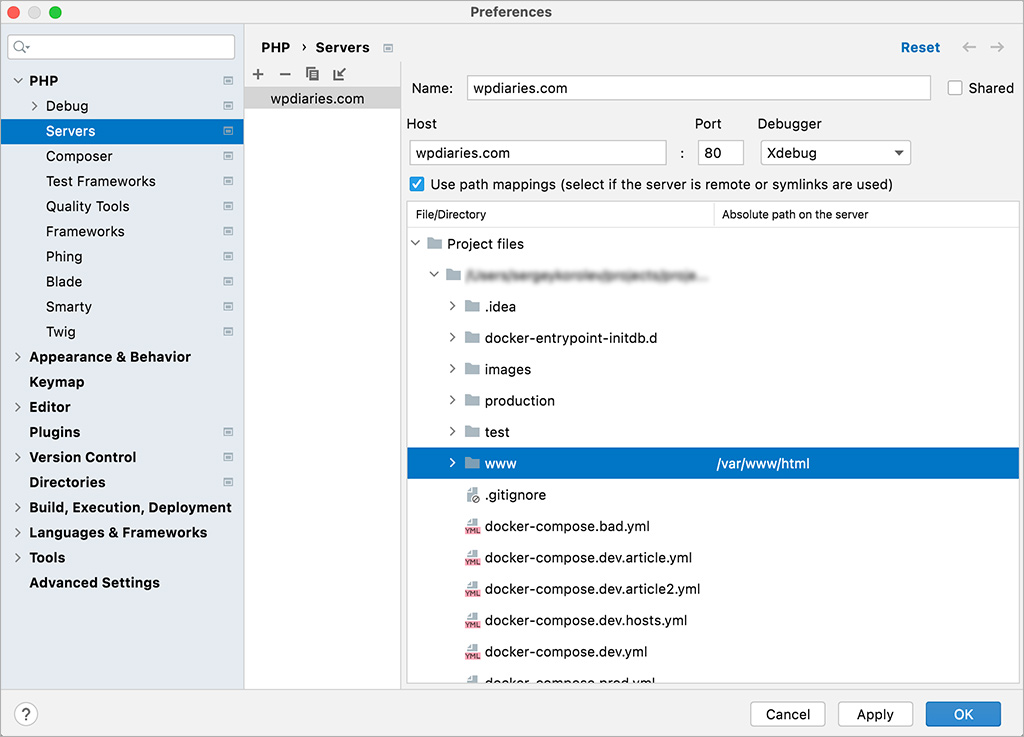
It is enough to map only the root directory of the project here (at least if you do not have symbolic links). The IDE will guess the paths for subdirectories down below the tree. So, in this case, I have mapped only www (the path to the root of the project PhpStorm sees in my local filesystem) to /var/www/html (the path to the root of the project Xdebug sees on the web server).
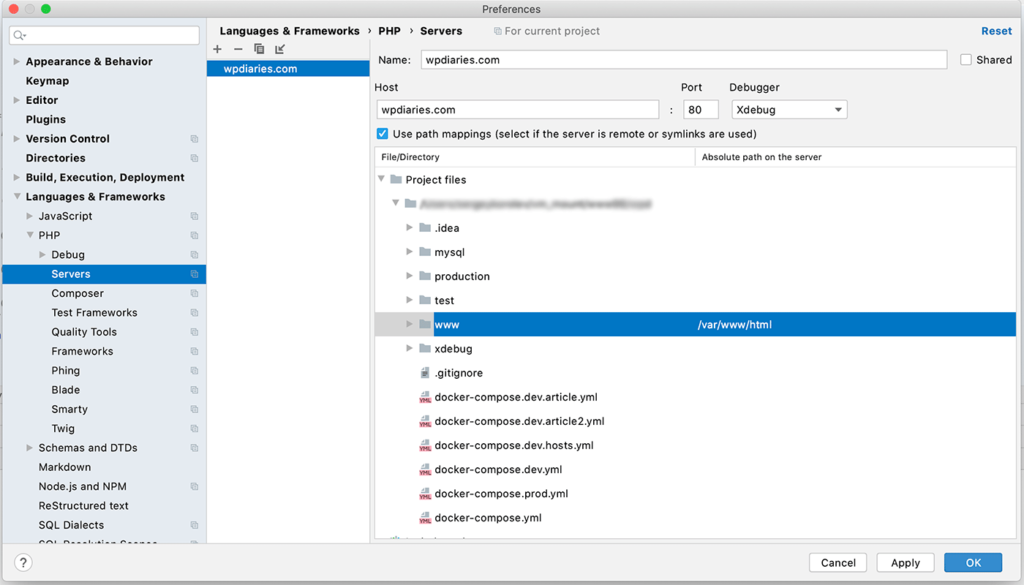
Please notice: The setting PhpStorm > Preferences > PHP > Servers on macOS (or File > Settings > PHP > Servers on Windows) is valid for recent versions of PhpStorm (versions 2021.1.4, 2021.2 and later versions).
In older versions of PhpStorm (like 2020.3.3 and below), the setting for path mapping was in:
macOS: PhpStorm > Preferences > Languages & Frameworks > PHP > Debug > Servers
Windows: File > Settings > Languages & Frameworks > PHP > Debug > Servers
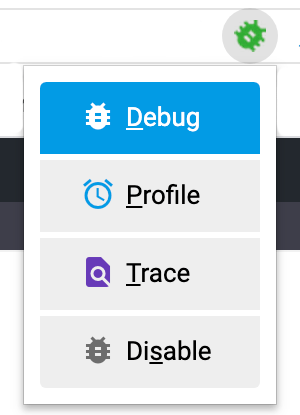
Now you will need to turn on debugging in the Chrome extension you’ve installed:
Now click the Start Listening button ![]() in PhpStorm (top left corner of the IDE screen). The button will start looking like this
in PhpStorm (top left corner of the IDE screen). The button will start looking like this ![]() . Or you could do the same via the top menu:
. Or you could do the same via the top menu:
Run > Start Listening for PHP Debug Connections
If you reload your site page in the browser now, you’ll start debugging.
You can read more about debugging in PhpStorm in the PhpStorm official documentation.
Also, if you are working in PhpStorm, you could consider changing a few PhpStorm default settings to make your development work a little bit faster (at least, this helps me with my own work).
Over the years of PHP programming, I’ve had the experience of using several IDEs for debugging PHP code. With PhpStorm I’ve had the best experience. Other IDEs I worked with were either more complicated to configure (which is tolerable of course) or gave me problems like hanging and refusing to debug till relaunched. With PhpStorm things have been much better. At least this is my personal experience. Yes, I couldn’t resist the temptation to say a few good words about my favorite IDE. 🙂
4. Using Multiple Compose Files in Development and Production Environments
Personally, I never use 1 Compose file with all the definitions at once. This contradicts the DRY (Don’t Repeat Yourself) principle. I think it is much better to keep the common configuration for the production and development environments in one Compose file. And add one separate Compose file defining additional things necessary in development. And one more additional Compose file defining things for production.
You can find more information on using multiple compose files for production and development environments in this article in the official Docker documentation. Also, please check this article on using Compose in production.
4.1 Development Environment
Let’s consider the development environment first.
This is an example of compose.yaml with common configuration options for development and production. The differences between the production and development configurations will be defined in separate Compose files below.
services:

  wordpress:
    container_name: wordpress-wpd
    restart: always

    environment:
      WORDPRESS_DB_HOST: db
      WORDPRESS_DB_NAME: mydbname
      WORDPRESS_DB_USER: mydbuser
      WORDPRESS_DB_PASSWORD: mydbpassword

    depends_on:
      - db

    volumes:
      - /opt/projects/wpd/www:/var/www/html

    networks:
      - backend-wpd
      - frontend-wpd

  db:
    container_name: mysql-wpd
    image: mysql:8.3.0
    command: --default-authentication-plugin=mysql_native_password
    restart: always

    environment:
      MYSQL_ROOT_PASSWORD: mydbrootpassword
      #MYSQL_RANDOM_ROOT_PASSWORD: '1' # You can use this instead of the option right above if you do not want to be able login to MySQL under root
      MYSQL_DATABASE: mydbname
      MYSQL_USER: mydbuser
      MYSQL_PASSWORD: mydbpassword


    volumes:
      - /opt/projects/wpd/mysql:/var/lib/mysql

    networks:
      - backend-wpd

networks:
  frontend-wpd:
  backend-wpd:
The separate Compose file with specific for the development environment configuration compose.dev.yaml will look like this:
services:

  wordpress:
    build:
      context: ./xdebug # a path to a directory containing a Dockerfile, or a url to a git repository

    ports:
      - "80:80"

    extra_hosts:
      - "test1.com:192.168.1.88" # Replace test1.com with your local test domain name
      - "www.test1.com:192.168.1.88" # Replace test1.com with your local test domain name

    environment:
      VIRTUAL_HOST: mydomain.com, www.mydomain.com
      # Set the XDEBUG_CONFIG as described here: https://xdebug.org/docs/all_settings#XDEBUG_CONFIG
      XDEBUG_CONFIG: remote_host=192.168.1.2

  db:
    ports:
      -  "3306:3306"
Of course, you need to substitute your own data as it’s been explained in the previous examples.
Now you can start the docker containers with the command:
docker compose -f compose.yaml -f compose.dev.yaml up -d
In our case, compose.dev.yaml adds/replaces individual configuration options in compose.yaml.
When you use multiple Compose files like this, each next Compose file adds/replaces individual configuration options in the Compose configuration. So the result would be the same, as if you merged the Compose files manually, adding or replacing options in the first file from the next file.
If you made any changes to Dockerfile, you can rebuild the WordPress container and restart with the command:
docker compose -f compose.yaml -f compose.dev.yaml up -d --build
If you need to stop the containers, you will need to run the corresponding command, listing the same Compose files you used when you started the containers:
docker compose -f compose.yaml -f compose.dev.yaml down
which will stop and remove the containers.
Similarly, you could run commands like
Please notice: If you are setting up an Oracle VirtualBox virtual machine for web development, and you would like to have your projects in Docker containers on that virtual machine, please see section 4.1.2.2 of the article VirtualBox: How to Configure an Ubuntu 20.04 Virtual Machine for Web Development. It explains how to mount a web project folder on a virtual machine using VirtualBox Guest Additions when projects are in Docker containers. The Docker containers configuration in that section is the same as we’ve seen right above (with some very minor additions required to avoid permission problems).
Also, this article shows how to set up an Oracle VirtualBox virtual machine for web development, configure network adapters, install Oracle VirtualBox Guest Additions, etc.
4.2 Production Environment
Let’s consider using multiple compose files for production now.
Please note that we consider only the barebone configuration for production here. I did not take into account security when I wrote this example. You need to check Docker documentation and security articles to secure your installation on production. This code is an example only. So enough with the disclaimer, let’s move to the configuration files…
4.2.1 Adding Nginx as a Reverse Proxy
I prefer to use Nginx as a reverse proxy for all WordPress sites on production. I use jwilder/nginx-proxy image for it (see jwilder/nginx-proxy on Docker Hub).
As in the previous sections, I prefer to have the Compose file to be separated into 2: one for development and one for production.
I normally place those 2 files to the directory /opt/projects/common/ on the host machine.
The compose.yaml file for the development environment looks pretty simple:
services:
  proxy:
    container_name: nginx-proxy
    image: jwilder/nginx-proxy
    restart: always

    ports:
      - "80:80"
      - "443:443"

    volumes:
      - /var/run/docker.sock:/tmp/docker.sock:ro

    # If the logging section is not commented,
    # Docker Compose logs
    # will show the HTTP server logs.
    logging:
      driver: "json-file"
      options:
        max-size: "200k"
        max-file: "10"

    networks:
      - frontend-wpd
      # other networks go here

networks:
  frontend-wpd:
    name: frontend-wpd # or it will be created as common_frontend-wpd
  # other networks go here
This is an example of one project behind the Nginx proxy server. Normally I have several projects running behind the proxy. In this case, I would add a separate network for each of the projects.
This compose.yaml is good for starting a project in this configuration in the development environment as:
docker compose up -d
In the development environment, everything is very simple. For example, I do not need SSL in the development environment. So Let’s Encrypt certificates were not added in the Compose file above.
At production, I add the following compose.prod.yaml containing additional (to the file above) configuration:
services:
  proxy:
    volumes:
      - /opt/projects/common/nginx/certs:/etc/nginx/certs
      - /opt/projects/common/nginx/vhost.d:/etc/nginx/vhost.d
      - /opt/projects/common/nginx/html:/usr/share/nginx/html
      - /opt/projects/common/nginx/conf.d:/etc/nginx/conf.d

  letsencrypt:
    image: nginxproxy/acme-companion
    container_name: letsencrypt-proxy
    restart: always

    environment:
      DEFAULT_EMAIL: test@example.com # replace with your e-mail
      NGINX_PROXY_CONTAINER: nginx-proxy

    depends_on:
      - proxy

    volumes:
      - /opt/projects/common/nginx/certs:/etc/nginx/certs
      - /opt/projects/common/nginx/vhost.d:/etc/nginx/vhost.d
      - /opt/projects/common/nginx/html:/usr/share/nginx/html
      - /opt/projects/common/nginx/conf.d:/etc/nginx/conf.d
      - /var/run/docker.sock:/var/run/docker.sock:ro
      - /opt/projects/common/nginx/acme:/etc/acme.sh

    logging:
      driver: "json-file"
      options:
        max-size: "200k"
        max-file: "10"

    networks:
      - frontend-wpd
      # other networks go here
For adding Let’s Encrypt we used nginxproxy/acme-companion.
Please notice: Previously, jwilder/nginx-proxy used jrcs/letsencrypt-nginx-proxy-companion for adding Let’s Encrypt. If your code still uses jrcs/letsencrypt-nginx-proxy-companion, you need to migrate to nginxproxy/acme-companion.
For examples of usage please see:
- this GitHub repository
- these examples of using Docker Compose
- this Compose file (it is still in the old format: named
docker-compose.ymlrather thancompose.yamland containing the version number)
In the example above we use the 2 container setup.
When getting certificates from Let’s Encrypt, take into account that the service has certain limitations. So, for example, if you are debugging and for some reason trying to get certificates for the same domains again and again, you could be blocked from getting certificates for 1 hour. The number of certificates per week and the number of renewals per week are also limited.
Now in the production environment, I start the Docker containers for the reverse proxy as:
docker compose -f compose.yaml -f compose.prod.yaml up -d
In this case, compose.prod.yaml adds/replaces individual configuration options in compose.yaml. Please see the explanation above.
When I need to stop the containers and remove them I use the command:
docker compose -f compose.yaml -f compose.prod.yaml down
Nginx proxy Docker container always needs to be started first. Other Docker containers (for WordPress and other projects running behind the proxy) should be started after the proxy. This is because the Docker container for proxy creates our networks (frontend-wpd in the example above). Other containers join these networks. If other production containers are started while the networks (they need to join) do not exist yet, you’ll get an error.
To list all current Docker networks, use:
docker network ls
This will show a table with the columns:
NETWORK ID— unique identifier of the networkNAME— the network nameDRIVER— the driver used (for example,bridge,overlay,host,macvlan)SCOPE— scope of the network (local,swarm, etc.)
To inspect a specific network for details (like which containers are attached), run:
docker network inspect <network_name>
For example, in our case:
docker network inspect frontend-wpd
4.2.2 Adding an Additional Compose File to Our WordPress Project
Now in addition to our compose.yaml, considered in the section Development Environment (and located in the directory /opt/projects/wpd), we need to add a Compose file with additional settings for the production environment. Let’s add the file compose.prod.yaml:
services:

  wordpress:
    image: wordpress

    expose:
      - "80"

    environment:
      VIRTUAL_HOST: wpdiaries.com, www.wpdiaries.com
      LETSENCRYPT_HOST: wpdiaries.com, www.wpdiaries.com

networks:
  frontend-wpd:
    external: true  # which also means this network must already exist before the container is run
    name: frontend-wpd  # or it will look for wpd_frontend-wpd
  backend-wpd:
You see that we are using the official Docker WordPress image here.
Also, we use expose instead of ports so our port 80 will be available to Nginx proxy but not available directly for external incoming connections.
Also notice that we join the network frontend-wpd here.
Now we can start our WordPress project (after we have started the Nginx reverse proxy container):
docker compose -f compose.yaml -f compose.prod.yaml up -d
And if we need to stop and remove the containers, we need to run (before stopping Nginx reverse proxy container):
docker compose -f compose.yaml -f compose.prod.yaml down
5. What if I Need to Add a PHP Extension to the WordPress Image?
The official Docker WordPress image is very minimal. It does not contain many PHP extensions which could be possibly required by WordPress plugins. The image is kept minimal to keep its size smaller (as explained in the section Adding additional libraries / extensions of the official WordPress image documentation).
But the official Docker WordPress image is based on the official PHP image. And the PHP image contains simple ways of adding PHP extensions. 3 helper scripts exist for it:
docker-php-ext-configuredocker-php-ext-installdocker-php-ext-enable
Let’s consider how to add a PHP extension to our WordPress image.
E.g. imagine we are trying to install a WordPress plugin and getting the following error message: Fatal error: Uncaught Error: Undefined class constant ‘MYSQL_ATTR_USE_BUFFERED_QUERY’. We understand that we need to install the PHP extension pdo_mysql.
First, we need to log in to our WordPress container terminal and check if the extension pdo_mysql has been installed already. Our WordPress container name (in the examples above) is wordpress-wpd. So we log in to the container terminal using docker exec like this:
docker exec -it wordpress-wpd bash
and check if the extension has been installed:
php -m | grep pdo
php -i | grep pdo
This shows that pdo_mysql wasn’t installed.
To install pdo_mysql we need to add the following line to our Dockerfile:
RUN docker-php-ext-install pdo_mysql
For the development environment (see section 1) we would just add this line to the end of the Dockerfile.
docker-php-ext-install does not rebuild the PHP executable itself. It only builds and installs additional PHP extensions into the already compiled PHP runtime.
As to the production environment, we could create our Dockerfile like this:
FROM wordpress:6.7.2-php8.4-apache

RUN apt-get update

RUN docker-php-ext-install pdo_mysql
And if the Dockerfile is located e.g. in the directory ./images/prod, our production environment file compose.prod.yaml from section 4.2.2 would look like this:
services:

  wordpress:
    dockerfile: Dockerfile # this line is actually redundant here - you need it only if you want to use some custom name for your Dockerfile
    context: ./images/prod # a path to a directory containing a Dockerfile, or a url to a git repository

    expose:
      - "80"

    environment:
      VIRTUAL_HOST: wpdiaries.com, www.wpdiaries.com
      LETSENCRYPT_HOST: wpdiaries.com, www.wpdiaries.com

networks:
  frontend-wpd:
    external: true  # which also means this network must already exist before the container is run
    name: frontend-wpd  # or it will look for wpd_frontend-wpd
  backend-wpd:
Now we can build our image and run the Docker container (like in section 4.2.2 – after we have started the Nginx reverse proxy container):
docker compose -f compose.yaml -f compose.prod.yaml up -d --build
We can stop and remove these containers by running (must be done before stopping the Nginx reverse proxy container):
docker compose -f compose.yaml -f compose.prod.yaml down
Conclusion
Thank you for reading this article to the end. I hope you liked it.
A few final notes:
1) You probably know that Docker is used without a hypervisor (such as VirtualBox, VMPlayer, HyperV, etc.) on Linux. Docker is container virtualization. It’s supposed to be used without a hypervisor. On Windows 10, Docker seems to run natively but in fact, uses a HyperV virtual machine with Linux behind the scenes. Docker for Mac also uses a hypervisor (based on xhyve) with a Linux virtual machine.
So, if you would like to install Docker for development purposes on a Mac or Windows computer and you would like to use your favorite Linux distribution there, you would need the Oracle VirtualBox (or another hypervisor like VMPlayer). In this case, please check this article on how to install the VirtualBox on Mac and Windows, create a virtual machine, and tune it for better performance.
2) If you have any questions or comments, I would be happy if you posted them below.
It would be great to hear from you.
Your feedback will be highly appreciated.
Hello, thanks for this wonderful, detailed and perfectly explained article.
I checked the images you created at Docker Hub and would like to ask you that, please upload a php7.2 wp5.5.1 image, so we can have all common environments.
Best regards
Hello. Thanks for the good words! I really appreciate them.
Yes, of course. I’ve pushed the image for WP 5.5.1 / PHP 7.2 to the Docker Hub repository. The image name is
wpdiaries/wordpress-xdebug:5.5.1-php7.2-apache
Just for the benefit of any possible future readers of this comment: all the currently available tags of the docker image wpdiaries/wordpress-xdebug could be found here:
https://hub.docker.com/r/wpdiaries/wordpress-xdebug/tags
Thanks man!
Thanks to you!
Thank you! Great guidance! I managed to get this working with Visual Studio code by specifying the path mappings detailed here:
https://jasonterando.medium.com/debugging-with-visual-studio-code-xdebug-and-docker-on-windows-b63a10b0dec
This is one of those things that you configure for hours and are so ready to see fail when you try it. I was pleasantly surprised when I saw that breakpoint being hit – see 2021 is already a better year than 2020!! 😉
Oh, one question – I’ve found that Xdebug makes WordPress incredibly slow – what would be the best way in this scenario to disable/enable Xdebug?
When I was running local Apache, I just had a two separate config files (one with debug enabled, the other one didn’t) and ran some scripts that copied the corresponding file and restored Apache.
Any way you can think of doin this on this docker solution?
Thanks!
Thank you very much for the nice words!
Yes, of course, you can do that. As described in section 4 of this article, you can use multiple docker-compose files with your project. That section describes having multiple docker-compose files for the development and production environments. But you could apply the approach with multiple docker-compose files to just your development environment too.
E.g. in your local development environment, you can have 2 different additions to your main docker-compose file: one which builds an image based on your Dockefile and another that just runs based on the standard Docker wordpress image. And you can run your project in one configuration or another depending on your needs.
I understand this is a brief reply. Please tell me if you would like me to add a more detailed explanation. I’ll gladly do that if you think it could be possibly more helpful.
This is nicely put together and very clear. Thank you. What I’m facing at the moment is a docker setup for developing a plugin, so I don’t have the wordpress codebase in my `${workspaceRoot}`, which leaves my IDE (VS Code) and/or xDebug looking for `index.php`.
Thanks for the good words!
XDebug does not look for index.php. With XDebug you can debug any scripts, not just index.php. I often use XDebug with non-WordPress projects. And, e.g. it is very useful for debugging PHP scrips called via AJAX. Often such scripts have names other than index.php (I do not mean MVC frameworks where all AJAX requests normally work through the same entry point, which is usually index.php).
But it is necessary to configure your IDE to work with XDebug. For PhpStorm I’ve described it in section 3. Debugging will work in any script, not just index.php. Just in case, to check, I’ve just created a test script with the name someFile.php in the webroot of my WordPress installation. It was a separate script with some simple test code. It did not depend on WordPress in any way. I set a breakpoint there and was able to debug it from PhpStorm without making any additional changes to the PhpStorm configuration (except previously made as described in section 3).
So, I think it would be necessary for you to check your IDE documentation. So that you could configure it to work with XDebug. If you can open a page in a browser and this page is formed with PHP, it should be possible to debug it. XDebug could be used for debugging any PHP script. Not just with index.php as an entry point.
Hey, Thanks for this. I’ve been trying to switch from VMs to Docker and xDebug was needed. The one part I found that needed to be added to get VSCode working on my mac was the `xdebug.start_with_request = true` needed to be in the xdebug.ini too.
My VSCode `launch.json` file contained the following:
“`
{
“version”: “0.2.0”,
“configurations”: [
{
“name”: “XDebug3”,
“type”: “php”,
“request”: “launch”,
“port”: 9003,
“log”: true,
“pathMappings”: {
“/var/www/html”: “${workspaceFolder}”
}
},
]
}
“`
I’ve put this here just incase someone else needs a reference.
Thanks Again!
Thanks for your comment! I hope this information will be useful to other people.
I did not check debugging in VS Code, to be honest. For the last years, I am using PhpStorm. And several years ago I used NetBeans a lot, and Zend Studio for some years before that. Among these 3 IDEs, I found PhpStorm the most convenient to configure and use the debugger.
Thanks for the input about VS Code.
And thanks for the nice words! I really appreciate them.
Hi
Yes, I can confirm that with the above ‘launch.json’ is also works with VS Code (on a Mac), which is awesome!
I didn’t find anywhere a note that you should map /var/www/html locally, however. So also adding that here, assuming that the code one wishes to debug lives locally.
Thanks you very much for your comment!
Smashing diaries only
I see that the settings for the db MYSQL_DATABASE / MYSQL_USER / MYSQL_PASSWORD are not taken from the environment but are set to the default. Is this by design?
Thank you very much for the good words!
These are environment variables that set the database name, user, and password for the database in the container db. This is how it is done usually. For example, these variables are set in a very similar way in the documentation to the official Docker wordpress image.
I’m a bit confused in which file the build: entry should be. Under 2. Using a ready made image the build: is missing but if I open a terminal under /usr/local/php/ I don’t see a xdebug.ini file.
Thank you for your question. To locate xdebug.ini, you’ll need to do the following:
1) Enter the terminal of the WordPress Docker container:
docker exec -it wordpress-wpd bash
, where wordpress-wpd is the name of the container (replace it with the name of your container if it’s different).
2) You’ll find xdebug.ini in the directory: /usr/local/etc/php/conf.d/
got it. thanks
Thank you for this article — I toiled a bit, but eventually got it working on my m2 mac Sonoma.
Used: wpdiaries/wordpress-xdebug:6.6.2-php8.3-apache
/usr/local/etc/php/conf.d/xdebug.ini is ( xdebug_info() is very useful in source code to check )
“`
zend_extension=xdebug.so
xdebug.mode=debug
xdebug.client_port=9003
xdebug.client_host=host.docker.internal
xdebug.start_with_request=trigger
xdebug.discover_client_host=1
“`
docker-compose.yml changes from article:
“`
services:
db:
…
volumes:
– type: bind
source: ./database
target: /var/lib/mysql
wordpress:
container_name: YOUR_CONTAINER
…
XDEBUG_CONFIG: client_host=localhost
“`
Thank you very much for your comment!