![[Docker] How to Set up Postfix Containers and Send Emails From WordPress in Docker](https://www.wpdiaries.com/wp-content/uploads/2020/07/smtp-150x150.jpg)
![[VirtualBox] Configure an Ubuntu 24.04 / 22.04 Virtual Machine for Web Development (Complete Guide)](https://www.wpdiaries.com/wp-content/uploads/2020/09/local-development-environment-150x150.jpg)

When developing for the web, we need a local development environment. Virtual machines on Oracle VirtualBox are very convenient for creating local virtual servers for web development. Because you could have as many web dev servers (on different virtual machines) as you need.
We’ll configure an Ubuntu 22.04 (or 20.04) Oracle VirtualBox virtual machine. On computers running Windows 10 or macOS.
Contents
1. Create an Ubuntu 24.04 / 22.04 / 20.04 Virtual Machine
If setting up a virtual machine is too elementary for you, please skip to section 2. Configure the Network. This is where some interesting stuff begins
The steps in this article are the same for Ubuntu 24.04 / 22.04 / 20.04 virtual machines.
First, you need to install the Oracle VirtualBox. To do it, you’ll have to run an exe-file for Windows or a dmg-file for macOS and follow the instructions of the installer. It is quite straightforward.
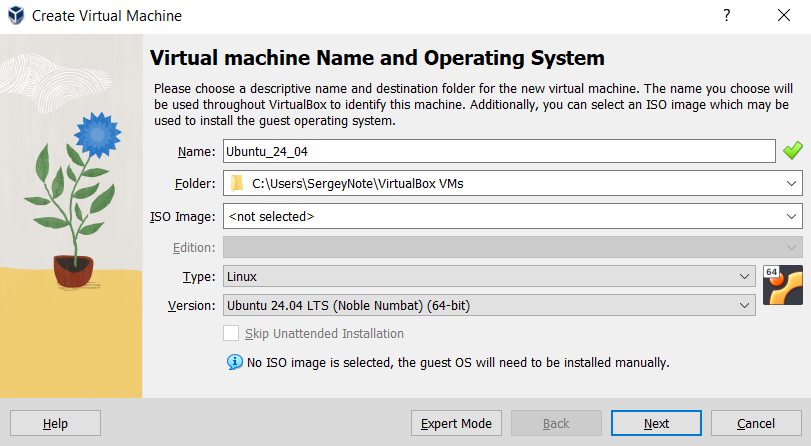
When the VirtualBox software is installed, you’ll need to create a new virtual machine:
The screenshots below are given for VirtualBox 7.0.22.
1. To create a virtual machine, run the Oracle VirtualBox and click the button ![]() New:
New:
2. In a window that opens, enter the virtual machine name, select the operating system, and click Next:
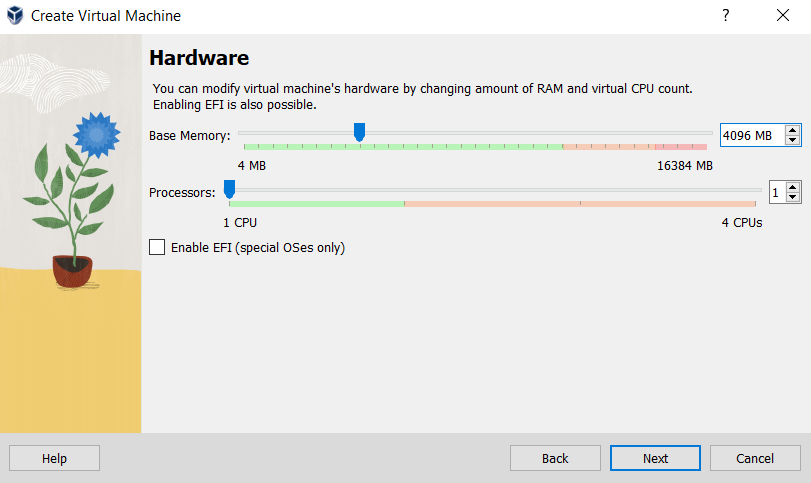
3. On the next screen, set the RAM for the virtual machine. The default is 1 GB. But I usually set it to 4 GB. It depends on how much memory you have on your host machine and how much you’re willing to allocate. In any case, you’ll be able to increase or decrease the virtual machine’s RAM after it’s been created.
Also, I usually go for 1 CPU.
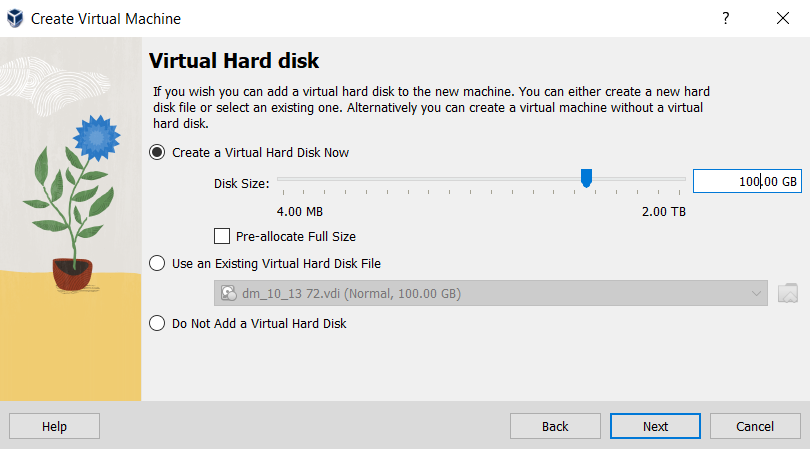
4. Then you’ll need need to choose the Create a Virtual Hard Disk Now option which is the default.
I usually set the Disk Size it to a larger value, like 100 GB. You never know how much additional space you’ll need.
Also, I always leave the Pre-allocate Full Size checkbox unchecked. This way, you’ll have a dynamically allocated disk. This means that initially, the virtual machine’s disk will be small — the virtual machine won’t take up much space on the host machine’s hard disk. Additional space will be allocated as needed.
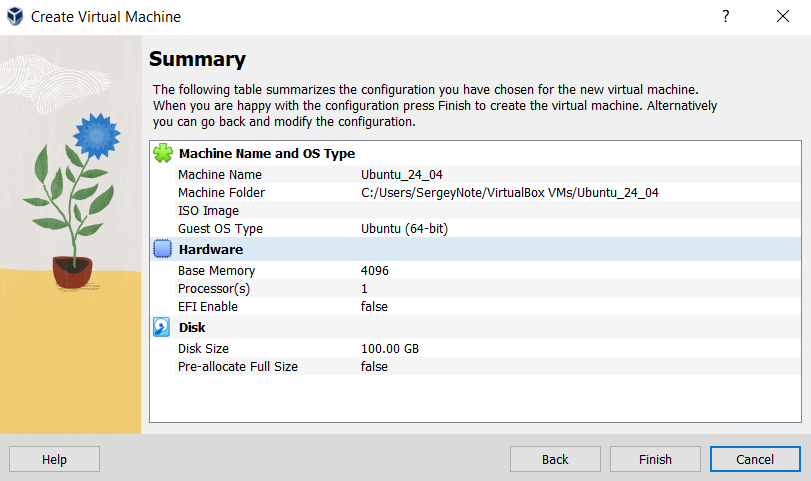
5. Review the summary and click Finish.
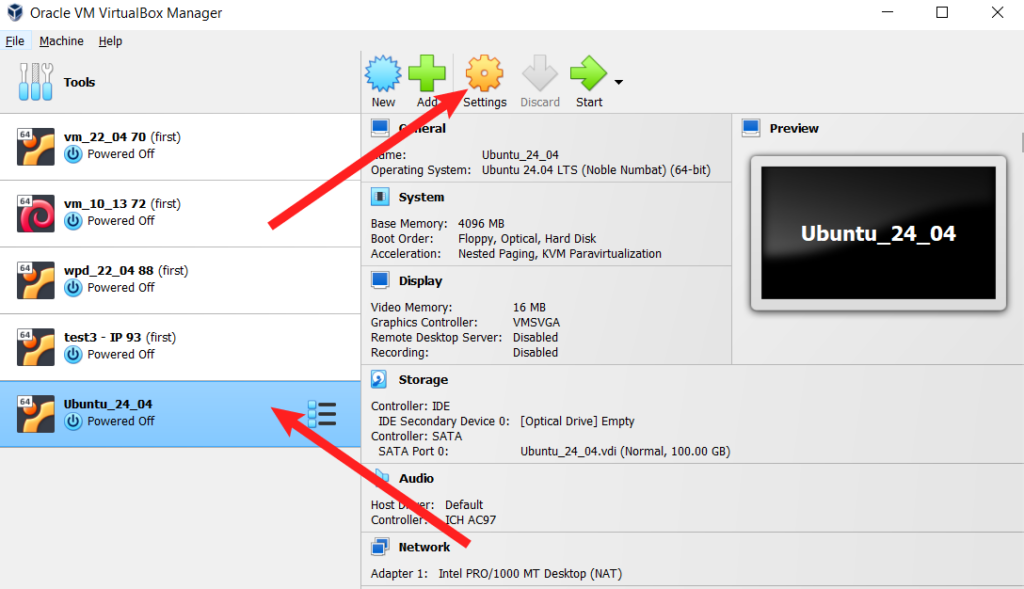
6. Now we need to install the Ubuntu operating system. So, you need to download the Ubuntu 24.04 Server .iso image. You can do it here (or just Google for “Ubuntu Server download”).
After downloading the .iso image, select your newly created virtual machine in the left panel, and click the Settings button ![]() :
:
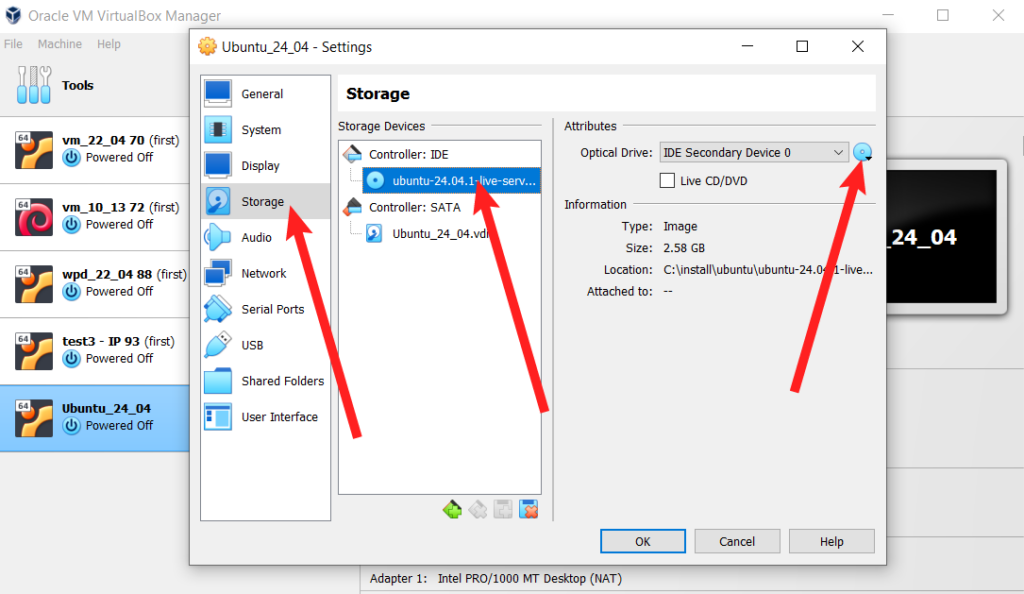
7. In the window that opens:
- Select the Storage tab.
- In the middle, under Controller: IDE select the CD-ROM item. It will display as Empty at this point.
- On the right of the Optical Drive:, click the CD-ROM icon.
- From the drop-down menu, select Choose a disk file… and locate the Ubuntu 24.04
.isoimage file you previously downloaded.
Also, please ensure that the virtual machine is set to boot from the CD-ROM first. This is done on the System tab of the same Settings window, and it is the default boot sequence.
8. Now, when you ![]() start your virtual machine, the Ubuntu 24.04 installation from the virtual CD-ROM will start.
start your virtual machine, the Ubuntu 24.04 installation from the virtual CD-ROM will start.
Please notice: If, for some reason, you have an old version of VirtualBox, please see this article for the process of creating a virtual machine on VirutaulBox 6.
The Ubuntu installation process is step-by-step and pretty straightforward. So I am not describing it here.
After Ubuntu has been installed, you need to install the packages you’ll need for web development. The easiest way is probably to use Docker. In this way, you can experiment easily with different versions of PHP, MySQL, etc. by running different Docker containers for them. For example, installing WordPress with XDebug in a Docker container is described in this article.
2. Configure the Network
There are 2 ways of Linux virtual machine network configuration (for a web development project):
You need to choose one of these 2 configurations (not both of them at once). To proceed with NAT + Host-only adapters configuration, go to section 2.1. To proceed with the bridged network adapter configuration, go to section 2.2.
2.1 Configure the Network on 2 Adapters: NAT Adapter + Host-only Adapter
We are using 2 network Adapters in this case:
- NAT adapter – for our Virtual Machine to access the Internet
- Host-only adapter – for us to access the VM locally by SSH, HTTP, etc.
In this case, our VM will be available by its IP address from our host machine only. It will not be available from other computers on our local network. It does not require a router at all (unlike the case of the Bridged adapter where the router is necessary). It does not consume a separate IP on the local network.
There’re Pros and Cons of this method:
Pros:
- No router required
- VM is not accessible from other computers
It does not take an additional IP address in your local network. It can not be accessed from other computers (if it’s what you want).
Cons:
- A little bit more difficult to configure
You need to configure 2 network adapters.
2.1.1 NAT Adapter
2.1.1.1 Add a NAT Network
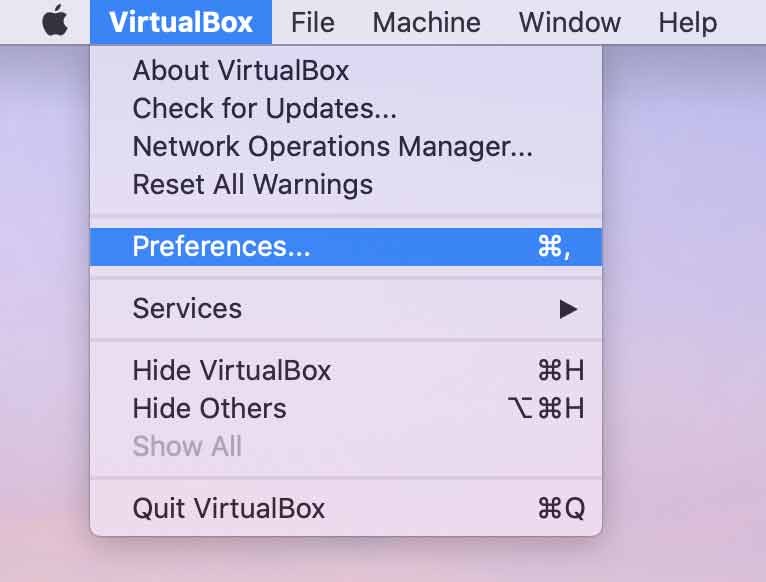
macOS: Open the VirtualBox Preferences menu (keyboard shortcut: ⌘,):
In the window that opens add the NAT network:

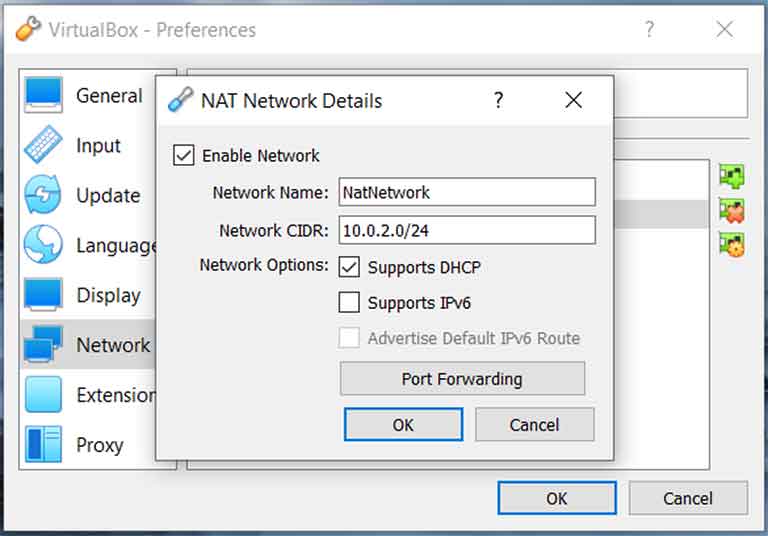
In my case the NAT network has been added with the following settings:

Please notice that this is a completely new network. For example, my network (where the host machine is located) is 192.168.1.0/24. But this new NAT network is 10.0.2.0/24. It is a completely different network of course.
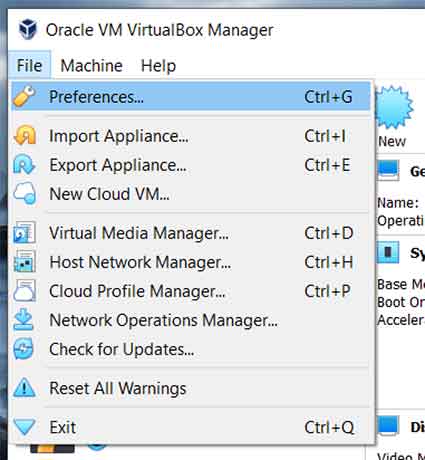
Windows: In the Oracle VirtualBox window click File > Preferences:
In the window that opens add the NAT network and click the OK button:
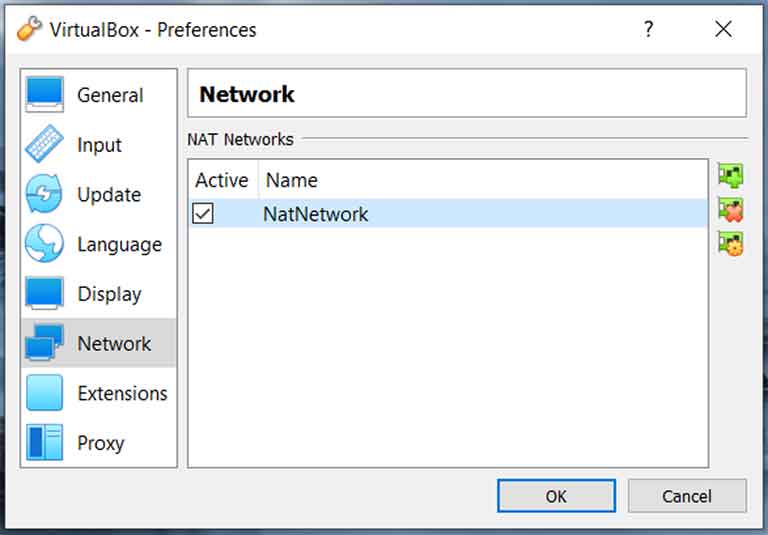
In my case the NAT network had the following parameters:
2.1.1.2 Configure the NAT Adapter for the Virtual Machine
Turn off your virtual machine if it is on.
macOS: With your VM selected go to ![]()
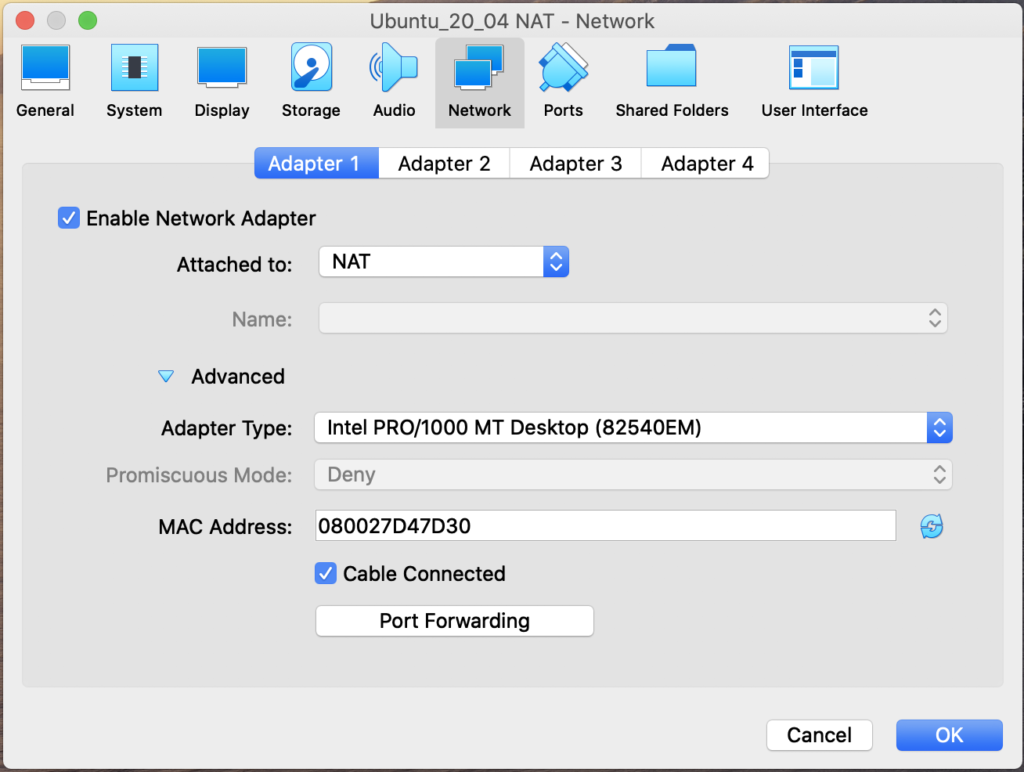
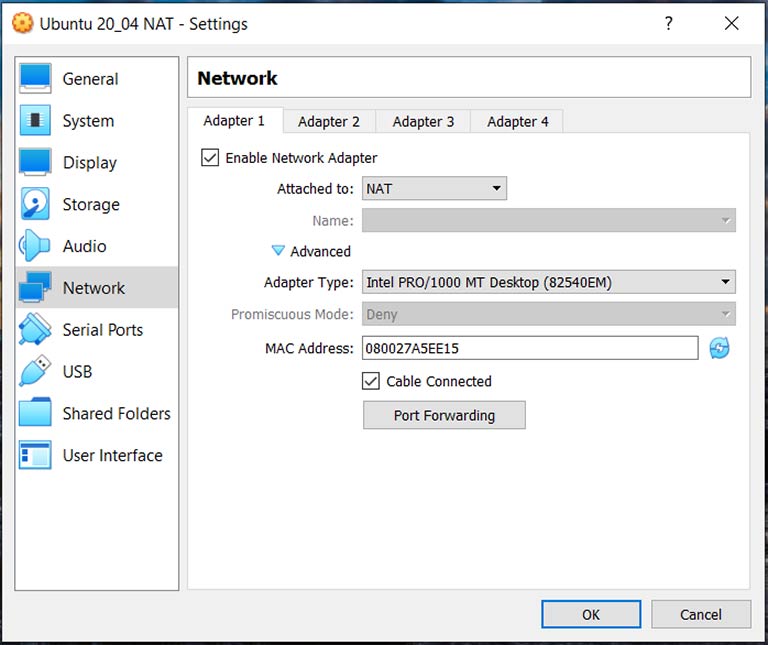
Settings > Network and set Adapter 1 to the NAT Adapter:
Windows: With your VM selected go to ![]()
Settings > Network and set Adapter 1 to the NAT Adapter:
2.1.2 Host-only Adapter
2.1.2.1 Add a Host Network
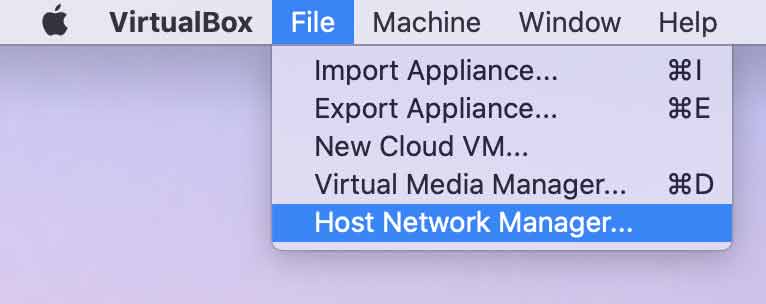
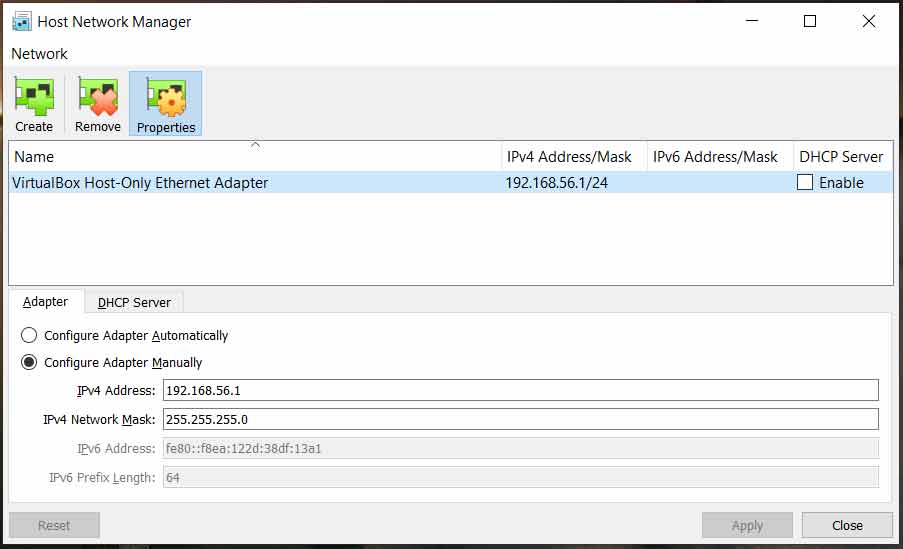
macOS: With the VirtualBox window in focus in the menu at the top of the screen click File > Host Network Manager...
In the window that opens add a host network:
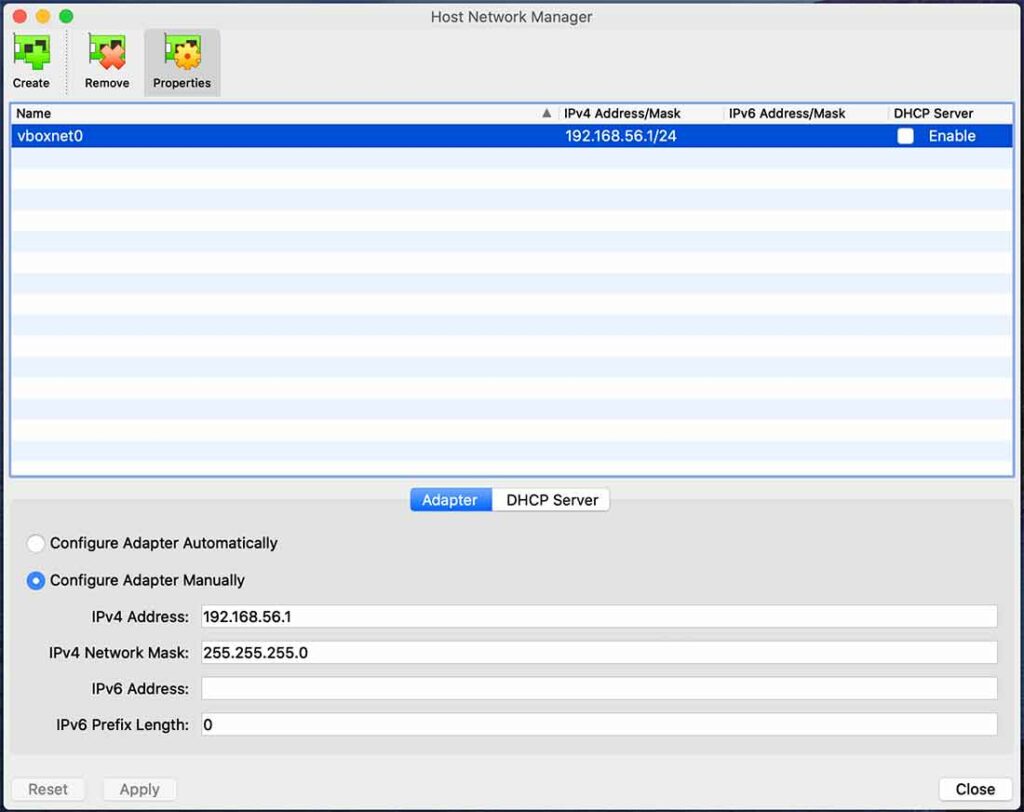
In my case, the created network was 192.168.56.1/24.
Please notice: this new network is quite different from the network where your host machine is located (your physical router network). E.g. in my case, my host machine was on the network 192.168.1.0/24 while this new network was 192.168.56.1/24.
Windows: Click File > Host Network Manager...
Add the host network:
2.1.2.2 Configure the Host-only Adapter for the Virtual Machine
Turn off your virtual machine if it is on.
macOS: With your VM selected go to ![]()
Settings > Network and set Adapter 2 to the Host-only Adapter:
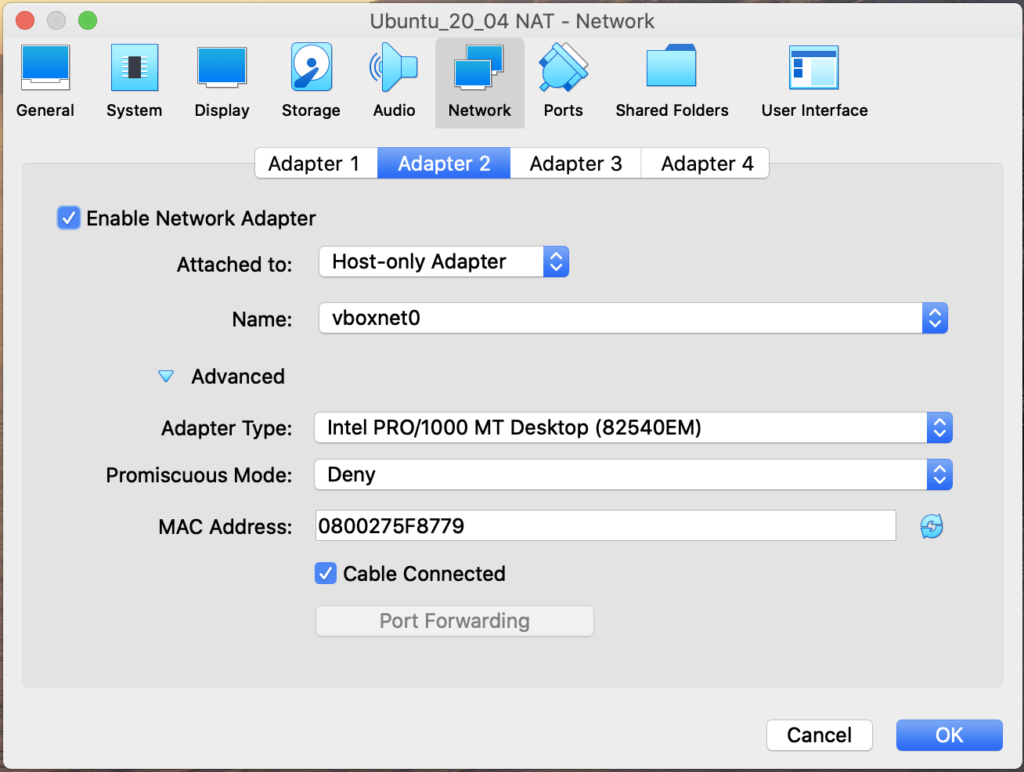
Choose the network name from the Name drop-down.
Windows: With your VM selected go to ![]()
Settings > Network and set Adapter 2 to the Host-only Adapter:

2.1.3 Set a Static IP for the Ubuntu Virtual Machine
Since the host network is 192.168.56.1/24 (see section 2.1.2.1), we must set the static IP of our virtual machine in this network. Let’s configure it as 192.168.56.2.
On Ubuntu 20.04 and Ubuntu 22.04:
Log in to your Virtual Machine and run in the terminal:
cd /etc/netplan/
sudo nano 00-installer-config.yaml
For the static IP 192.168.56.2 change the file contents from this:
# This is the network config written by 'subiquity'
network:
  ethernets:
    enp0s3:
      dhcp4: true
  version: 2
to this:
network:
  ethernets:
    enp0s3:
      dhcp4: true
    enp0s8:
      dhcp4: false
      addresses: [192.168.56.2/24]
  version: 2
Here we’ve configured the network interface enp0s3 for the NAT network (the IP of the VM in this network is obtained via DHCP) and the network interface enp0s8 for the host-only network (where we’ve configured the static IP address 192.168.56.2 for the VM).
To apply the changes, run:
sudo netplan apply
This must work fine both on Ubuntu 20.04 and Ubuntu 22.04.
2.1.4 Add the Static IP to the File hosts on the Host Machine
In our case, the VM will be accessible from the host machine by the IP address 192.168.56.2. The VM can be accessed by this IP from the host machine only (where we run the VirtualBox). We can’t access the VM from any other computer on our local network.
To be able to access the VM not only by the IP address but also by a hostname (domain name) from our host machine, we need to add the hostname to the file hosts on the host machine:
192.168.56.2 mytestsite.com
This file is called the same (hosts) on macOS, Windows, and Linux.
macOS: On Mac, we can edit the hosts file like this:
sudo nano /etc/hosts
Add the following line to the file:
192.168.56.2 mytestsite.com
and save the file.
On the previous versions of macOS I also had to flush Mac’s DNS cache like this:
sudo killall -HUP mDNSResponder
but on macOS Big Sur (and macOS Catalina) it does not seem to be required any longer.
Now if you e.g. run an HTTP server on your VM, you would be able to access it from the browser prompt by your domain name – in our case mytestsite.com.
Please note that on your host machine the domain name mytestsite.com will always resolve to 192.168.1.98 now. So if mytestsite.com really exists on the Internet, you will be accessing 192.168.1.98 instead.
Windows: If your host machine is under Windows, then your hosts file could be found by the following path (if Windows is installed by the default path): c:\Windows\System32\drivers\etc\hosts
You’ll have to add the same (as for the macOS) line to the file hosts:
192.168.56.2 mytestsite.com
And then you’ll need to run
ipconfig /flushdns
from the Windows terminal to flush the DNS cache under Windows.
Linux: Under Linux, the file hosts is normally located in the directory /etc. So you edit it like:
sudo nano /etc/hosts
and add the same line as in the examples above:
192.168.56.2 mytestsite.com
Now you can access your site from your host machine e.g. by the URL http://mytestsite.com.
Please notice: You can not access this VM from other computers on your local network. If you need this VM to be accessible from other computers, configure the network on the Bridged adapter instead (which is described in section 2.2 right below).
2.1.5 Enable SSH Access for the root User on the Virtual Machine
Having an SSH access for the root user on production is generally considered insecure. Though many VPS hosting companies have the SSH root access enabled in their images for Ubuntu VPS servers. Probably, they think, it could be acceptable if the users used some very strong password for root or, better, an SSH key.
But on a virtual machine in the development environment, root access could be useful. It might save a little bit of time for the developer when working from the terminal.
So, if you think, you might need SSH access under root in the local development environment, the steps are listed below.
These steps worked fine on all versions of Ubuntu since Ubuntu 14.04. Including Ubuntu 24.04/22.04/20.04.
1. Login under a sudoer, and then change to the root user:
sudo su
2. Set a password for the user root:
passwd
Enter a new password for root. Make sure the password is strong.
3. Install the ssh service:
apt install ssh
4. Edit the file /etc/ssh/sshd_config:
nano /etc/ssh/sshd_config
Find the commented line:
#PermitRootLogin prohibit-password
Uncomment it and set:
PermitRootLogin yes
5. Restart the service ssh:
systemctl restart ssh
Now you can connect to your VM via SSH:
macOS: On Mac you can connect from the terminal like this:
ssh root@192.168.56.2
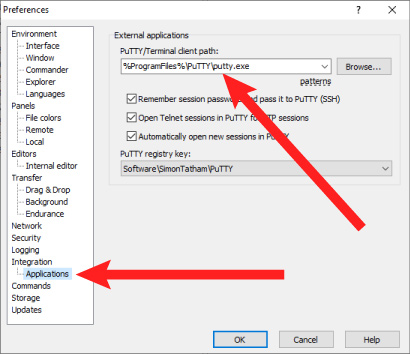
Windows: On Windows, I would recommend using WinSCP. It is similar to Total Commander (or Midnight Commander or Norton Commander if you remember those very old times).
Also, WinSCP could be easily integrated with Putty. If integrated, it will run Putty (already authenticated) automatically when you start a new SSH session.
To configure integration with Putty:
- In WinSCP top navigation go to:
Options > Preferences - In the left panel choose:
Integration > Applications - Enter the correct path to
putty.exeon your local hard drive - Make sure the checkbox Automatically open new sessions in Putty is checked
- Click the button OK
2.2 Configure the Network on a Bridged Adapter
In this case, your VM will look and behave like a separate computer in your local network. It will have a different (from your host machine) IP address. And it will be accessible on your local network (not just from your host machines but from other computers as well) by this IP address.
There’re Pros and Cons of this method:
Pros:
- Simpler to configure
You need only 1 network adapter. And you do not need any additional VirtualBox configuration (like e.g. adding a NAT network or adding a Host-only adapter – as in section 2.1 above) - VM is accessible from anywhere on your local network by the VM IP address.
So your server could be easily shown e.g. to your co-workers.
Cons:
- Requires a router (yes, a physical device). No router? Configure the network on NAT + Host-only adapters as in section 2.1.
- VM is accessible from anywhere on your local network
So, anyone on your local network could try to access it (and maybe it’s not what you want). - VM takes a separate (from your host machine) IP address on your local network
So you might need to talk to your system administrator or warn your colleagues. Or they could try to acquire the same IP and you would get some IP conflicts.
2.2.1 Configure the Bridged Adapter for the Virtual Machine
Your VM with a bridged adapter will appear as a separate computer on your local network.
Let’s configure it.
Turn off your virtual machine if it is on.
macOS: For your VM go to ![]()
Settings > Network and set Adapter 1 to the Bridged Adapter:
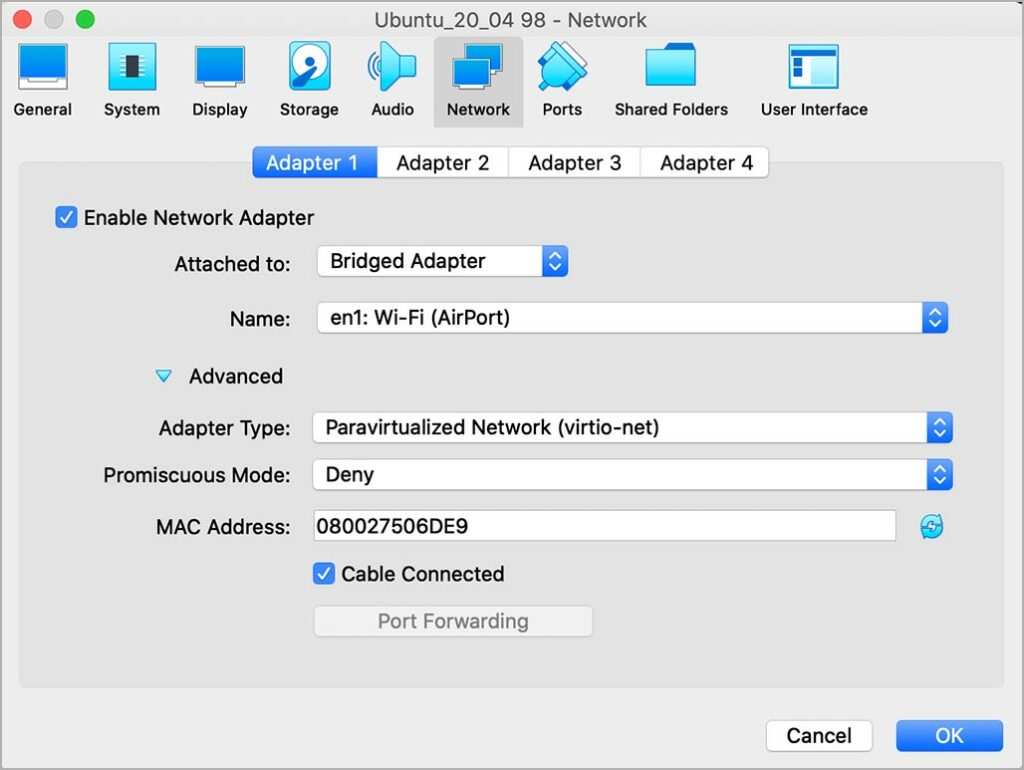
The default Adapter Type would be Intel Pro/1000 Mt Desktop. You can leave it as is. But I’ve set it to Paravirtualized Network (virtio-net) hoping for some performance improvement.
Windows: For your VM, go to ![]()
Settings > Network and set Adapter 1 to the Bridged Adapter:

2.2.2 Set a Static IP for the Ubuntu Virtual Machine
Let’s set the static IP address for our Ubuntu 22.04/20.04 Virtual Machine.
In my case, I’ve configured my local network (in my router settings) to use the subnet 192.168.1.0/24. And my router has the IP address 192.168.1.1. My host machine has the static IP 192.168.1.50. And I’ve decided to set the static IP address 192.168.1.98 for my Ubuntu VM.
On Ubuntu 24.04:
Log in to your Virtual Machine. In the Ubuntu terminal run:
cd /etc/netplan/
sudo nano 50-cloud-init.yaml
The initial file content will be:
# This file is generated from information provided by the datasource.  Changes
# to it will not persist across an instance reboot.  To disable cloud-init's
# network configuration capabilities, write a file
# /etc/cloud/cloud.cfg.d/99-disable-network-config.cfg with the following:
# network: {config: disabled}
network:
  ethernets:
    enp0s3:
      dhcp4: true
  version: 2
Changes to this file actually persist across the server reboot, but they might be overwritten by cloud-init — please see this post for a detailed explanation.
So, to disable the cloud-init‘s network configuration capabilities, run in the terminal:
sudo sh -c 'echo "network: {config: disabled}" > /etc/cloud/cloud.cfg.d/99-disable-network-config.cfg'
This will create the file /etc/cloud/cloud.cfg.d/99-disable-network-config.cfg and add the line network: {config: disabled}
to it, as suggested in the comments in 50-cloud-init.yaml right above.
On Ubuntu 22.04/20.04:
Log in to your Virtual Machine. In the Ubuntu terminal run:
cd /etc/netplan/
sudo nano 00-installer-config.yaml
The initial file contents will be:
# This is the network config written by 'subiquity'
network:
  ethernets:
    enp0s3:
      dhcp4: true
  version: 2
On Ubuntu 24.04/22.04:
To change to static IP 192.168.1.98, change the default Netplan configuration file:
- on Ubuntu 24.04 it is
/etc/netplan/50-cloud-init.yaml - on Ubuntu 22.04 it is
/etc/netplan/00-installer-config.yaml
But on both versions of Ubuntu, you modify the file content in the same way:
network:
  version: 2
  ethernets:
    enp0s3:
      dhcp4: false
      addresses: [192.168.1.98/24]
      nameservers:
         addresses: [8.8.8.8, 8.8.8.4]
      routes:
         - to: default
           via: 192.168.1.1
Apply the changes:
sudo netplan apply
Also, please see the Netplan configuration examples and the site netplan.io.
On Ubuntu 20.04:
To change the dynamic IP to static IP 192.168.1.98, change the file /etc/netplan/00-installer-config.yaml contents to:
network:
  ethernets:
    enp0s3:
      dhcp4: false
      addresses: [192.168.1.98/24]
      gateway4: 192.168.1.1
      nameservers:
         addresses: [8.8.8.8, 8.8.8.4]
  version: 2
I used Google DNS servers here: 8.8.8.8, 8.8.8.4. You can use any DNS servers you wish instead of course.
Now to apply the changes, run in the terminal:
sudo netplan apply
That would work on Ubuntu 20.04.
On Ubuntu 22.04, this /etc/netplan/00-installer-config.yaml from Ubuntu 20.04 would work too. But you would see a warning:
** (generate:1319): WARNING **: 02:50:58.543: `gateway4` has been deprecated, use default routes instead.
See the ‘Default routes’ section of the documentation for more details.
2.2.3 Add the Static IP to the File hosts on the Host Machine
At this stage, we can access our virtual machine by its IP address 192.168.1.98 only. To be able to access our virtual machine from our host machine by some hostname (domain name), we need to add this name to the file hosts.
To be able to access this virtual machine by the hostname (domain name) from our host machine, we need to add the hostname (in our case mytestsite.com) to the file hosts on the host machine:
192.168.1.98 mytestsite.com
To access this virtual machine by the hostname (e.g. by the URL http://mytestsite.com) from another computer on our local network, we’ll need to add the same line to the file hosts on that computer.
If you do not know how to add this line to the file hosts under macOS, Windows or Linux, please see section 2.1.4 above. It’s described there in detail.
3. Add Guest Additions to the Ubuntu Virtual Machine
Why do you need Guest Additions? To share a local folder (with your project files) with the virtual machine.
Some IDEs, for example, PhpStorm, work slowly with network shares. So it is better to keep your project files locally in a folder on your host machine. And share this folder with the virtual machine.
The sections right below show how to install Guest Additions. Section 4.1 shows how to share a folder with a virtual machine using Guest Additions.
3.1 Install Required Packages on the Ubuntu Virtual Machine
The process is the same for Ubuntu 24.04, 22.04 and 20.04.
Login to your Ubuntu virtual machine terminal. First, you need to update all Ubuntu packages:
sudo apt update & apt upgrade -y
Now run:
sudo apt install linux-headers-$(uname -r) dkms build-essential
Technically dkms is not required for the Guest Additions to work. But if you do not install the package, the Guest Additions would stop working after the next VM kernel update. So it is better to install this package right away (it must be installed before installing guest additions).
Now you need the file VBoxGuestAdditions.iso of the same version as the version of your VirtualBox.
For macOS users: under macOS Catalina, I had to use VirtualBox 6.1.2. Because I had some performance problems with 6.1.12 (the most recent version of VirtualBox at that time). But when I upgraded to macOS Big Sur, version 6.1.2 did not work for me anymore. So under macOS Big Sur, I am using the most recent version of VirtualBox (which is 6.1.16 at the time of writing this text). But if you are still under macOS Catalina and having any performance problems with your virtual machines, you could try downgrading the VirtualBox to version 6.1.2.
You can locate the file VBoxGuestAdditions.iso on the computer where your VirtualBox has been installed:
3.2 Locate VBoxGuestAdditions.iso on your computer
macOS: Go to your Applications directory, locate the file VirtualBox, right-click on it, select Show Package Contents:
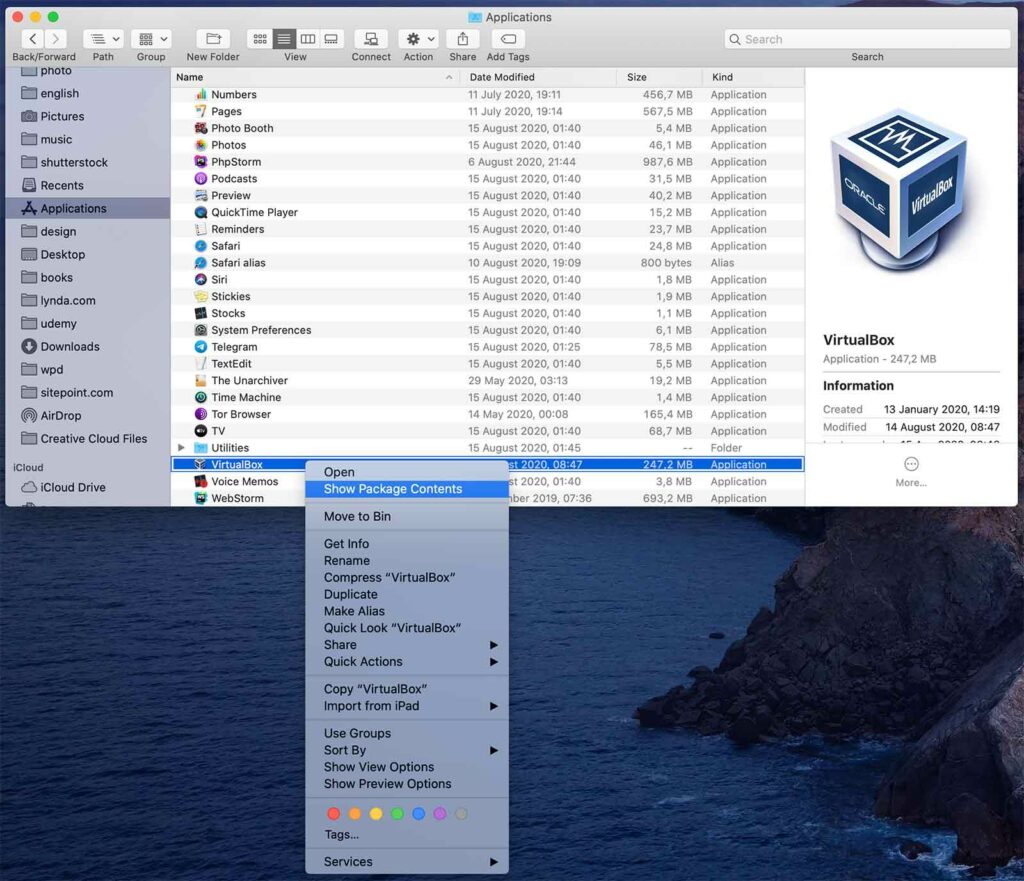
This will open the package contents. There under Contents > MacOS locate the file VBoxGuestAdditions.iso:
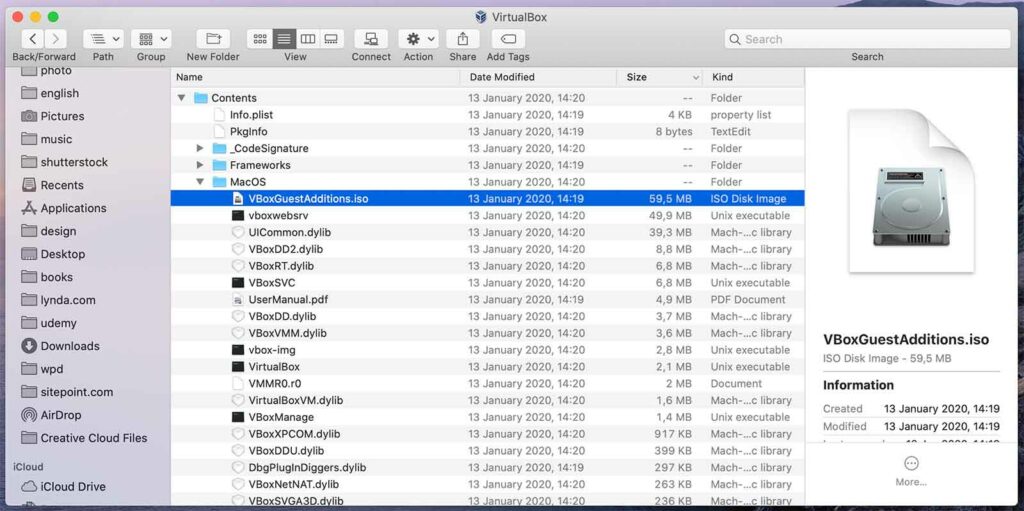
Copy the file VBoxGuestAdditions.iso to any directory on your computer.
Windows: The file VBoxGuestAdditions.iso could be found in the directory where the VirtualBox is installed. By default it is: c:\Program Files\Oracle\VirtualBox\
Just right-click on the VirtualBox desktop shortcut and see the installation path for the VirtualBox on your computer:
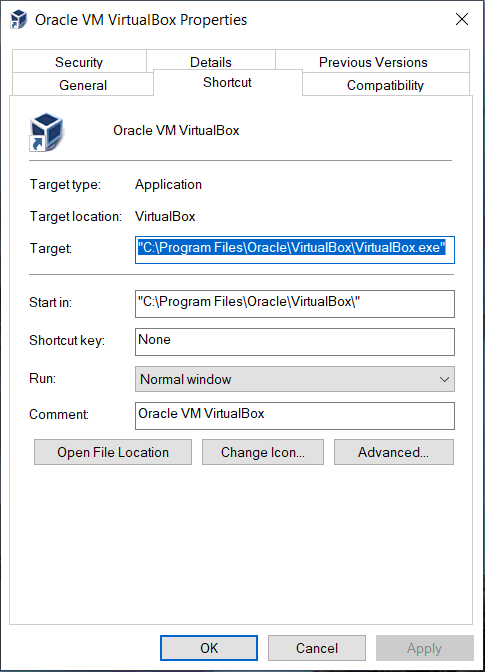
The file VBoxGuestAdditions.iso will be in the same folder as VirtualBox.exe.
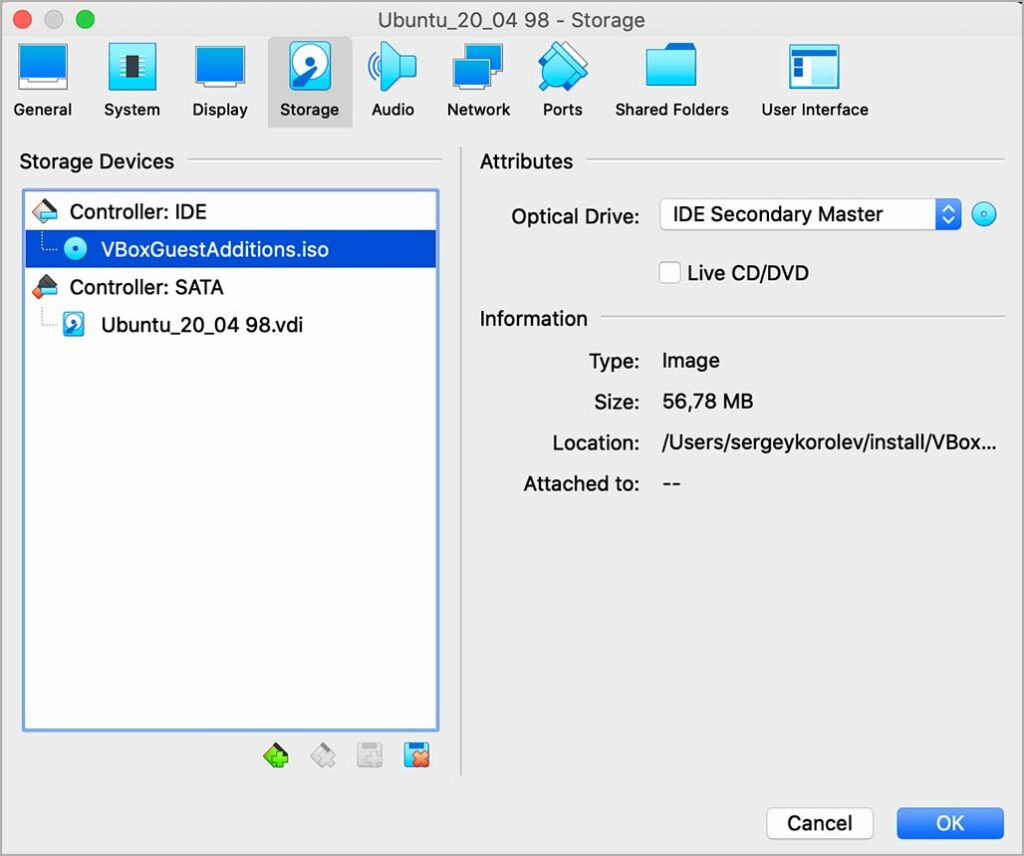
3.3 Install Guest Additions on the Ubuntu Virtual Machine
Turn off your VM if it is on.
macOS: In the VirtualBox interface for your VM go to ![]()
Settings > Storage. Add the disk file VBoxGuestAdditions.iso to your VM Optical Drive:
Windows: The same as for Mac, for your VM go to ![]()
Settings > Storage. Add the disk file VBoxGuestAdditions.iso to your VM Optical Drive:
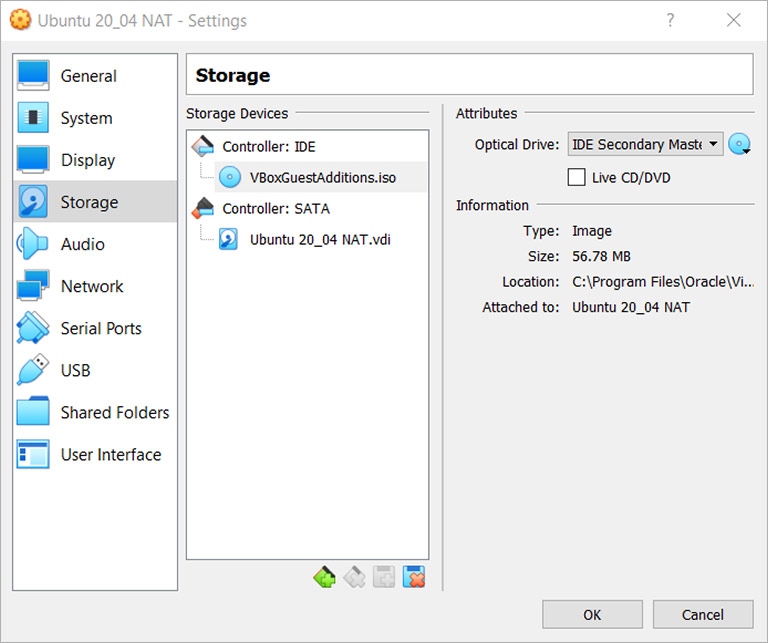
You do not need to boot from this optical drive.
Turn your VM on.
Now mount this optical drive to some directory on the Ubuntu VM. In the Ubuntu terminal run (I am mounting to the subdirectory cdrom of the Ubuntu current user home directory – you can mount to any other directory of course):
cd
mkdir cdrom
sudo mount /dev/cdrom cdrom
You’ll get the message “WARNING: device write-protected, mounted read-only.”. It’s OK of course – a CD-ROM is supposed to be read-only.
Now run:
cd cdrom
sudo ./VBoxLinuxAdditions.run
In the end, you’ll get the message “VirtualBox Guest Additions: Running kernel modules will not be replaced until the system is restarted”. So reboot the VM for the changes to take effect:
reboot
Please also check the 4.1 Introduction to Guest Additions section of the VirtualBox documentation.
3.4 Check that the Guest Additions have been installed successfully
To check the Guest Additions have been really installed, run this command from the VM console:
lsmod | grep vbo
If the Guest Additions have been installed successfully, you will see vboxguest in the results. E.g. in my case the result looked like this:

Also you could check this reply and this Youtube video.
4. How to Share a Folder Between the Host Machine and a Virtual Machine
Our VM runs a Linux server (Ubuntu 20.04 Server in our case). You could use some text editor like vim or nano for web development there of course, but I doubt it would be convenient for any serious programming work. Normally you need an IDE for web development (e.g. PhpStorm or Netbeans). So you would install your IDE on your host machine and somehow give it access to the folder on the VM (which is a guest machine) where your project source files are located.
There are 2 main ways to make the folder with project source files available to the IDE on the host machine:
- Create a folder on the host machine and make it available to the VM (see section 4.1).
The project files are located in a folder on the host machine. Your IDE will work fast with them. But if there are a lot of file operations on your web server (which is normal for many frameworks and CMS), this will slow your system down. - Create a folder on the VM and make it available to the host machine (see section 4.2).
The project folder is located on the VM and shared with the host machine. File operations on the VM will run fast. But the IDE on the host machine will have slow access to the files.
Some IDEs (e.g. PhpStorm) could have serious performance problems if the web project is installed on a network share. So it is much better to use the 1st scenario (see section 4.1) with such IDEs.
In the 2nd scenario, you could be forced e.g. to turn off some sync features and built-in Git support in PhpStorm. Just to make the IDE work faster.
Let’s consider both approaches.
4.1 How to Share a Folder on the Host Machine with an Ubuntu 22.04 / 20.04 Virtual Machine Using Guest Additions
In this scenario, you have a folder on your macOS host machine’s hard drive. And you want to share this folder for the VirtualBox virtual machine.
If you use this for your project folder, your IDE (which is installed on your host machine) with work fast with your project files. But any file operations on the VM will work slower.
There are 2 ways to mount a host machine folder on a VM using Guest Additions:
- Manual mounting – see section 4.1.1.
Manual mounting requires running a few more commands in the terminal than auto-mounting. But this type of mounting is much more flexible. And does not have many problems auto-mounting has. It is more suitable for web projects. - Auto-mounting – see section 4.1.2.
Auto-mounting could be done quickly. But it is less flexible than manual mounting. And if used with web project folders, requires additional configuration changes. Auto-mounting could be recommended for some simple tasks only – when you need to mount some folders quickly. But for web project folders, manual mounting is more suitable.
4.1.1 Manual Mounting
4.1.1.1 Manual Mounting a Shared Folder Using Guest Additions
Manual mounting is probably the best way to mount a shared folder. We can mount under any user or group. To any folder. And without any prefix for the folder on the guest machine (unlike with auto-mounting).
Suppose your web project files are in the folder myproj on your Mac host machine. And you want to mount this folder as /var/www/wpdiaries on your Ubuntu 24.04, 22.04, or 20.04 VM.
1. Turn on your VM.
2. On the VM under Ubuntu run:
sudo apt-get update
On Ubuntu 22.04 or 20.04 install the package virtualbox-guest-dkms (on Ubuntu 24.04 it is unavailable):
sudo apt-get install virtualbox-guest-dkms
On Ubuntu 24.04, 22.04 or 20.04 install the package virtualbox-guest-utils:
sudo apt-get install virtualbox-guest-utils
(source)
3. Turn off your VM.
4. Go to the VM ![]() Settings. In the dialog that opens click the item Shared Folders. Then click the button Add new shared folder.
Settings. In the dialog that opens click the item Shared Folders. Then click the button Add new shared folder.
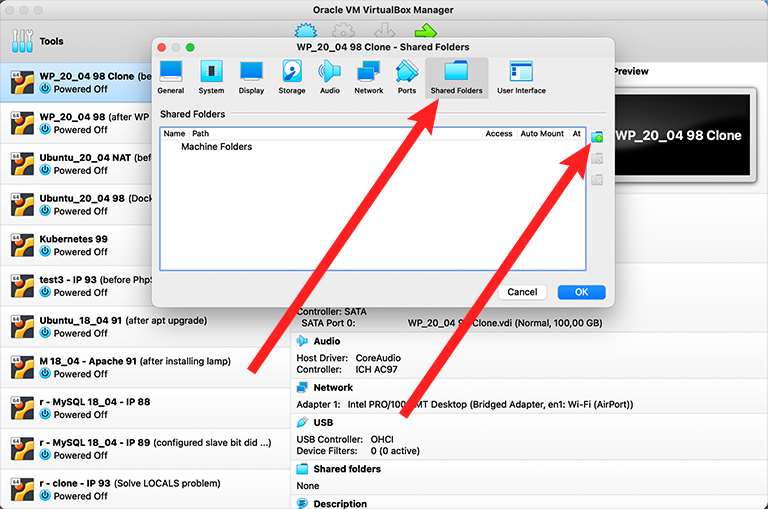
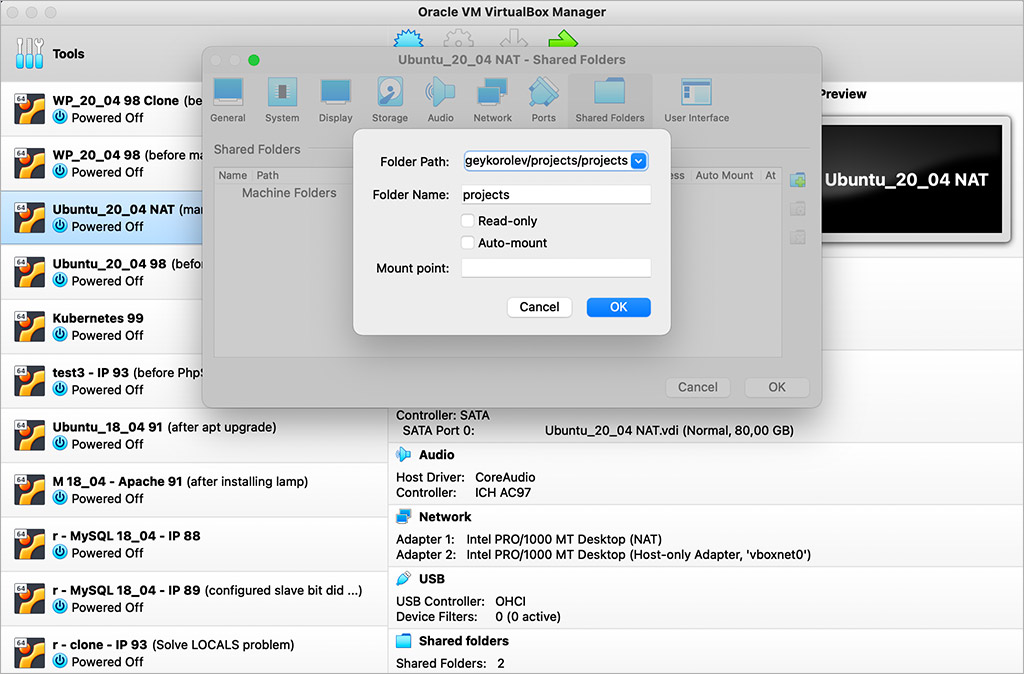
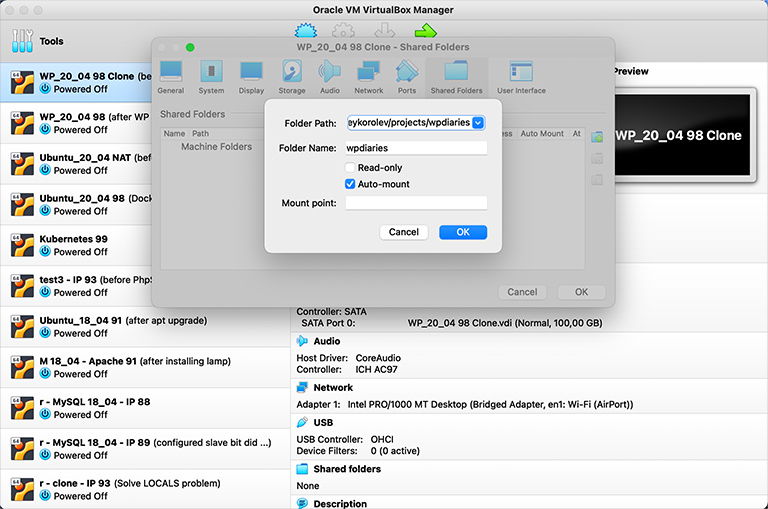
5. In the dialog that opens select the path to your project files folder (an existing folder on your host machine) in the field Folder Path. Enter the name under which you want the guest machine to see the folder in the field Folder Name. Make sure that the option Auto-mount is not checked. Click OK.
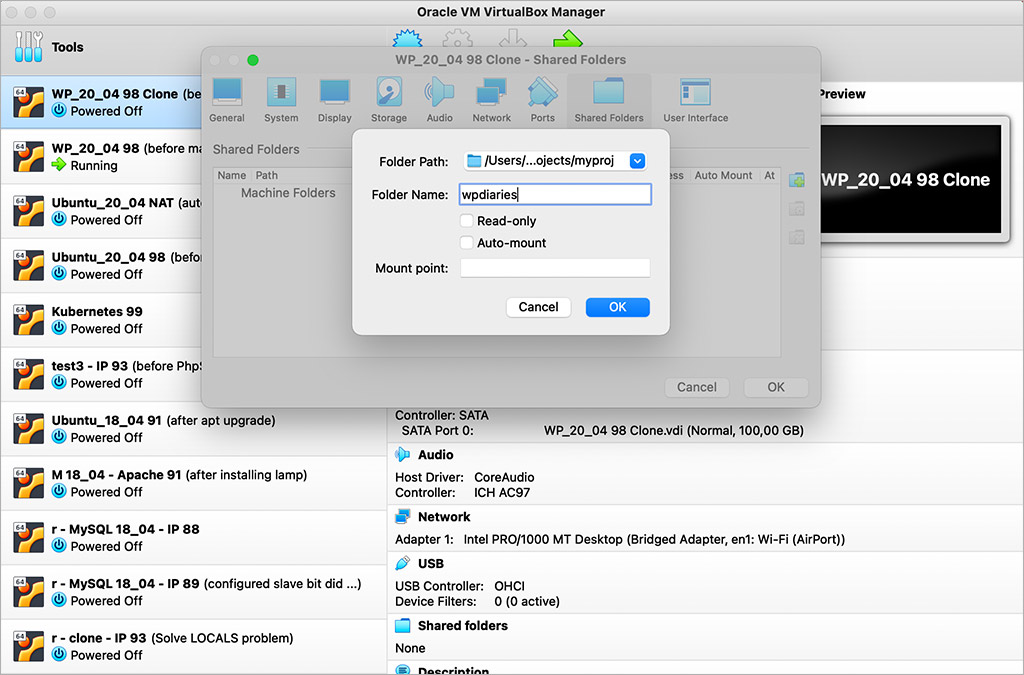
In this dialog:
- Folder Path is the path to the shared folder on the host machine.
- Folder Name is the name of your share for the guest machine. This is the name under which the guest machine will see your shared folder. And this is the name you will use in the
mountcommand on the guest machine. - Auto-mount must be unchecked this time. We are mounting manually.
- Make Permanent – if you have this option in your version of VirtualBox, check it. It will make the share permanent (it will persist on the VM power off). If the option is unchecked, the share will be transient (will not persist on VM reboot).
If you do not have this option in your version of VirtualBox, the share will be permanent by default.
6. Let’s mount our project under the user www-data and group www-data (the user and group under which an HTTP server normally runs on Ubuntu).
Turn on your VM.
Find the UID of the user www-data and the GID of the group www-data (we will need them in the mount command). In the Ubuntu terminal run:
id -u www-data
getent group www-data
(source)
In my case both the UID of the user www-data and the GID of the group www-data were 33.
Make sure the directory where you are going to mount (in my case, /var/www/wpdiaries) exists on the VM. If not, create it:
cd /var/www
mkdir wpdiaries
You may need to reboot the VM after creating the directory. Or manual mounting could result in an error:
/sbin/mount.vboxsf: shared folder ‘/var/www/wpdiaries’ was not found (check VM settings / spelling)
Now you can mount your share (in my case wpdiaries) under UID=33 and GID=33 to the folder /var/www/wpdiaries on your VM:
mount -t vboxsf -o rw,uid=33,gid=33 wpdiaries /var/www/wpdiaries
where
-t vboxsfmeans that the filesystem type isvboxsf-omeans options. The following options are set:rwmeans we mount the directory with read and write permissionsuid=33means that the files and folders will be mounted under user ID 33 (under which an HTTP server normally runs on Ubuntu)gid=33means that the files and folders will be mounted under group ID 33 (under which an HTTP server normally runs on Ubuntu)
wpdiariesis the share name (which we have defined in the shared folder parameters in the dialog above)/var/www/wpdiariesis the mount point i.e. the directory on the VM where our host machine folder will be mounted
If necessary, you could always unmount the share on your VM like this:
umount /var/www/wpdiaries
You should not be inside this directory in the terminal when unmounting. Or you’ll get the error message target is busy.
7. To get this shared folder mounted automatically each time you start your VM, you need to add this share to the file /etc/fstab under Ubuntu.
First, make a copy of the file fstab:
cp -prv /etc/fstab /etc/fstab.old
Add the following line to the file /etc/fstab. It will mount our share (in my case wpdiaries) to the folder /var/www/wpdiaries under UID=33 and GID=33:
wpdiaries /var/www/wpdiaries vboxsf auto,rw,uid=33,gid=33 0 0
(source)
8. Reboot your VM:
reboot
Also, since we added the option auto to our options in the file fstab, the command for mounting all shares should also work (though it will not be necessary since the share will be mounted on the VM start):
mount -a
Additional reading:
Official VirtualBox documentation on manual mounting
Ubuntu mount command reference
Ubuntu documentation on the fstab file format
4.1.1.2 Manual Mounting Shared Folder on Windows 10 Using Guest Additions
Mounting of a Windows 10 shared folder on an Ubuntu 22.04 (or 20.04) guest machine is the same as described in the previous section.
But there is a problem. The permission system on Windows is very different from permission systems on Mac or Linux. So all the files from the Windows host machine shared folder will be mapped to the Linux virtual machine folder with permissions -rwxrwxrwx by default.
For some rare files in your project, such permissions could be possibly necessary. But for most files, such permissions could be not really secure. And if you add these files to git with such permissions, you’ll deploy them on production with the same permissions later. Which could be very undesirable.
More than that, if you work with the same PHP project both on your Mac computer and on Windows machine, you would notice, that on the Windows machine git marks most of your project files as modified (due to the permissions change).
And if you check any such file:
git diff index.php
, you’ll see:
diff --git a/index.php b/index.php
old mode 100644
new mode 100755
I doubt you would want to commit and push all such files to git with these new permissions. Because this could lead to a possible security problem.
For permissions, octal 7 = 4 for read + 2 for write + 1 for execute permissions.
So, 0755 differs from 0644 by the executable bit of file permissions being set to 1 for the file owner, for the group, and for others. This is definitely not what you could possibly want for most files in your project.
By the way, if you try to change the permssions manually in the Windows-to-Linux shared folder on the VM:
chmod 0644 index.php
, this command will be ignored. The permissions will stay the same as before.
So, not to make undesirable permission changes in the git repository (which would later be deployed on production) you may want to make git ignore the executable bit of files for the current local repository (please be very careful with permissions if doing this):
git config core.fileMode false
or globally for all git repositories:
git config --global core.fileMode false
Please notice: You need to be very careful when you choose to ignore the executable bit of file permissions by git. All new files will still be added to git with permissions 0755 by default. You may want to change these permissions right on production (or, better, your dev/staging server) on deployment. And push the files back to git with correct permissions.
You would need to control which permissions you have on production very carefully.
4.1.1.3 Manual Mounting when Projects Are in Docker Containers
If you have your projects running in Docker containers as described in the article How to Add XDebug to the Official Docker WordPress Image, the approach could be similar.
Suppose you have a folder projects on your host machine. And all your web projects are located in subfolders of this folder. And you need to mount this folder projects from your (e.g. macOS) host machine to the folder /opt/projects/ on your VM (running Ubuntu 20.04). I.e. we work with our projects on the VM exactly as it was described in the article on using Xdebug with Docker.
The first steps are the same as steps 1 to 4 of section 4.1.1.1.
In step 5, in the dialog that opens, choose the path to the folder projects on your host machine in the field Folder Path. Enter the name under which you want the guest machine to see the folder in the field Folder Name (in our case I’ve entered projects). And make sure that the option Auto-mount is not checked.
6. Then, similar to how it has been done in step 6 of section 4.1.1.1, you could mount your directory projects as
mount -t vboxsf -o rw,uid=33,gid=33 projects /opt/projects
where
-t vboxsfmeans that the filesystem type isvboxsf-omeans options. The following options are set:rwmeans we mount the directory with read and write permissionsuid=33means that the files and folders will be mounted under user ID 33 (under which an HTTP server normally runs on Ubuntu)gid=33means that the files and folders will be mounted under group ID 33 (under which an HTTP server normally runs on Ubuntu)
projectsis the share name (which we’ve defined in the shared folder parameters in the dialog above)/opt/projectsis the mount point i.e. the directory on the VM where our host machine folder will be mounted
And later you could unmount this folder as
umount /opt/projects
7. Now we need to deal with the permissions problem of the MySQL named volume (if we have one):
Suppose we have a project configuration based on multiple Docker Compose files in our development environment. Exactly as was described in section 4.1 of the article How to Add XDebug to the Official Docker WordPress Image.
In that section, we had MySQL in a separate Docker container. The container name was mysql-wpd. And we had a named volume for the MySQL database:
    volumes:
      - /opt/projects/wpd/mysql:/var/lib/mysql
But the folder /opt/projects/ is mounted from the host machine. It is mounted under the user and group www-data.
So MySQL will be unable to write inside this folder. And the MySQL Docker container will be restarting endlessly (if we try to start it).
To avoid any permission problems, I prefer to move this database-related named volume out of the mounted folder. And place it in some (native Ubuntu) folder on the VM outside of the mounted folder /opt/projects. Let’s create a (normal Ubuntu) folder /opt/projects_local on the VM for storing our named volumes:
mkdir /opt/projects_local
To make that change in the development environment only, I add this volume to the file compose.dev.yaml (see section 4.1 of the article How to Add XDebug to the Official Docker WordPress Image). The following 2 lines need to be added to the very bottom of the file (in the section db):
    volumes:
      - /opt/projects_local/wpd/mysql:/var/lib/mysql
And the file compose.dev.yaml from section 4.1 of the article on adding XDebug to the official Docker WordPress image will take the form:
services:

  wordpress:
    build:
      context: ./xdebug # a path to a directory containing a Dockerfile, or a url to a git repository

    ports:
      - "80:80"

    environment:
      VIRTUAL_HOST: mydomain.com, www.mydomain.com
      # Set the XDEBUG_CONFIG as described here: https://xdebug.org/docs/remote
      XDEBUG_CONFIG: remote_host=192.168.1.2

  db:
    ports:
      -  "3306:3306"

    volumes:
      - /opt/projects_local/wpd/mysql:/var/lib/mysql
Now e.g. we can rebuild the WordPress container and start our containers with the command:
docker compose -f compose.yaml -f compose.dev.yaml up -d --build
For more details on using multiple Compose files to start Docker containers with different configurations in production and development environments, please see the article How to Add XDebug to the Official Docker WordPress Image. It is described there in detail.
8. Automating mounting our folder projects is done very similar to how it was done in section 4.1.1.1:
First, make a copy of the file fstab:
cp -prv /etc/fstab /etc/fstab.old
And now add the following line to /etc/fstab:
projects /opt/projects vboxsf auto,rw,uid=33,gid=33 0 0
Reboot your VM after making this change.
Please notice: Before you shut down your VM, it’s always better to stop your Docker containers first. Otherwise, you could get a situation when the database gets corrupt and the MySQL Docker container begins to restart endlessly (when you try to start it).
4.1.2 Auto-mounting
4.1.2.1 Auto-mount a Shared Folder Using Guest Additions
Auto-mounting could be used if you need to mount some folders quickly. But it’s less flexible than manual mounting. It’s less suitable for web projects. Still, we’ll consider it here for the sake of completeness:
The first steps are the same as steps 1 to 4 of section 4.1.1.1. Do them.
In step 5, in the dialog that opens, choose the path to your project files folder in the field Folder Path. Enter the name under which you want the guest machine to see the folder in the field Folder Name. Check the option Auto-mount. Click OK.
6. Start your VM.
By default, a folder on the host machine will be mapped to a subfolder /media on the Ubuntu guest machine. The mapped subfolder name will be the same as the name of the folder on the host machine but prefixed with sf_ (where sf stands for shared folder).
E.g., in my case, the folder wpdiaries/ on the host machine will be mapped to /media/sf_wpdiaries/ on my VM running Ubuntu 20.04.
4.1.2.2 Redefine Guest Properties
By default, your host machine directory will be mounted as a subdirectory of the directory /media on the virtual machine. We do not always want it. E.e. if our HTTP server was Apache, we would probably want to mount our web project directory as a subdirectory of /var/www/ rather than of /media/.
Also, all mounted directories have the prefix sf_ by default. Probably it would be good to remove this prefix.
According to the Guest Additions documentation, to change the directory on the guest machine where the host machine directories are mounted, and to change the mounted directory name prefix from sf_ to something else, we need to redefine the guest properties /VirtualBox/GuestAdd/SharedFolders/MountDir and /VirtualBox/GuestAdd/SharedFolders/MountPrefix correspondingly.
7. Let’s redefine the guest property /VirtualBox/GuestAdd/SharedFolders/MountDir.
Before you share a directory from the host machine to the guest machine, some sources recommend creating a mounted folder on the VM in advance and giving it full permissions. I did not do this. The folder on the guest machine gets created automatically when you mount it from the host machine. I did not even change the permissions of the parent folder /var/www/ (which are 755 by default).
To redefine a guest property you need to use VBoxManage guestproperty commands. E.g. one of my virtual machines has a strange name WP_20_04 98 (I like to add the last byte of a VM IP address to the name of the VM – in this case, 98 stands for the IP 192.168.1.98).
To check which guest properties are defined for your VM currently: Turn on the VM (or no properties will be output). In the Mac terminal run the command:
VBoxManage guestproperty enumerate "WP_20_04 98"
but replace WP_20_04 98 with the name of your currently running VM. For me the output was the following:
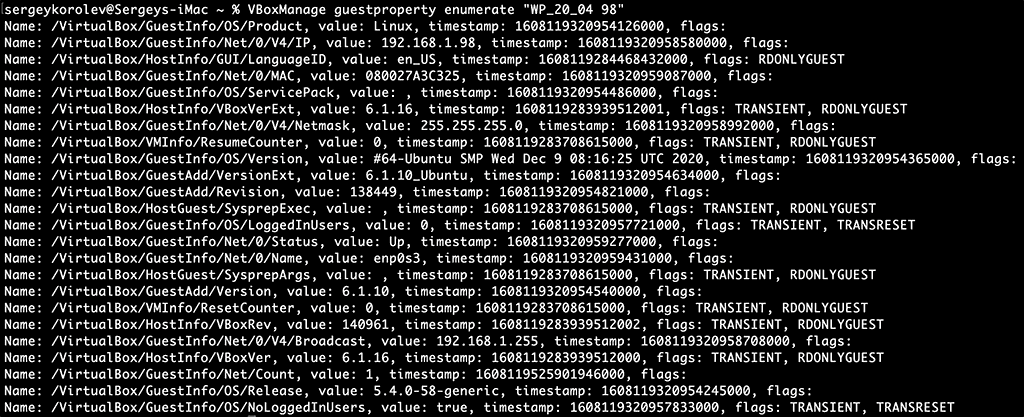
Or we could check only properties starting with /VirtualBox/GuestAdd/:
VBoxManage guestproperty enumerate "WP_20_04 98" --patterns "/VirtualBox/GuestAdd/*"

As you can see, neither /VirtualBox/GuestAdd/SharedFolders/MountDir nor /VirtualBox/GuestAdd/SharedFolders/MountPrefix are defined for the VM yet. Let’s set /VirtualBox/GuestAdd/SharedFolders/MountDir:
VBoxManage guestproperty set "WP_20_04 98" "/VirtualBox/GuestAdd/SharedFolders/MountDir" "/var/www/"
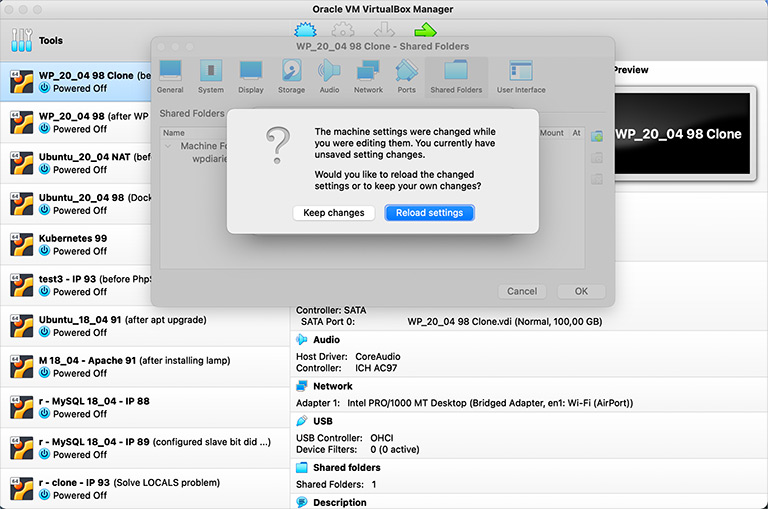
This set command does not require the VM to be on or off. I tried both. And in both cases, the property was set for me. Though if you have the VM off, its settings open, and you try to update a guest property from a terminal, you’ll be asked if you wish to reload the changes made in the terminal or keep the old settings:
After running the set command, when your VM is on again, to make sure the guest property has been changed, run:
VBoxManage guestproperty enumerate "WP_20_04 98" --patterns "/VirtualBox/GuestAdd/*"
This time it should output something like:

After the VM is rebooted:
reboot
the shared folders will be mounted under /var/www/ on the VM.
E.g., in my case, the folder wpdiaries/ on the host machine will be mounted to /var/www/sf_wpdiaries/ on the VM (not to /media/sf_wpdiaries/ as before).
8. Probably it would be good to replace the default mounted directory prefix sf_ with an empty string.
If you try one of these 2 commands:
VBoxManage guestproperty set "WP_20_04 98" /VirtualBox/GuestAdd/SharedFolders/MountPrefix
VBoxManage guestproperty set "WP_20_04 98" /VirtualBox/GuestAdd/SharedFolders/MountPrefix ""
it should not work. Because according to the official documentation, setting a property to an empty value should clear the property and reset it to the default value (which is "sf_" for the prefix).
Some sources (e.g. this) recommend setting the prefix to "/" to make the prefix an empty string:
VBoxManage guestproperty set "WP_20_04 98" /VirtualBox/GuestAdd/SharedFolders/MountPrefix "/"
Unfortunately, under macOS Big Sur 11.1 with VirtualBox 1.1.16 and VM running Ubuntu 20.04, this did not work for me.
Sometimes I was able to set the directory prefix to an empty string. But after several reboots, it reverted back to the default sf_.
Currently, I left the default prefix as sf_ for all directories I mounted with auto-mounting. So e.g. a directory wpdiaries on Mac mounts to /var/www/sf_wpdiaries on the VM. I left it as is. Maybe not too pretty. But at least reliable.
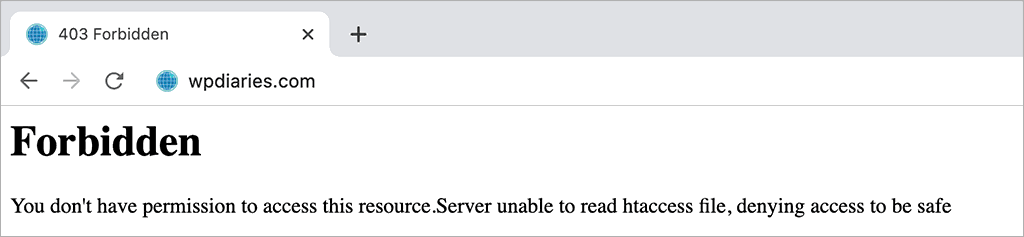
Please notice: After you share your folder e.g. from your Mac to Ubuntu 20.04 VM using Guest Additions, your shared files and folders on the VM will be under the user root and group vboxsf. For both, with full permissions. But any permissions for “others” will be absent. So no program on the VM, which is not under user root or in the group vboxsf, will even be able to read these files. Including your HTTP server.
The user www-data (default Apache2 user on Ubuntu) will be unable to read files inside you web project directory. You’ll get a message like: You don’t have permission to access this resource. Server unable to read htaccess file, denying access to be safe.
The solution could be to add the user www-data to the group vboxsf on the virtual machine (on the local development server only, not accessible from the Internet of course, since giving Apache additional permissions is not really safe):
sudo usermod -a -G vboxsf www-data
An even more interesting situation could be if you run your WordPress project on your VM inside a Docker container:
4.1.2.3 Solve Docker Permissions Problem
In this section, we’ll assume that we are running a WordPress project inside a Docker container as described in the article on adding XDebug to a Docker WordPress container.
In this case, you can enter the Docker container console by running the following command in your VM console (here, like in the article on XDebug, I assume that the WordPress container name is wordpress-wpd):
docker exec -it wordpress-wpd bash
You will enter the Docker container terminal and find yourself inside the folder /var/www/html.
There you can check under which user and group your project files and folders have been mapped:
ls -la
In my case, my project files belonged to the user root and to group 998, which was not added to the container.
To check which groups exist in your container, you can run:
compgen -g | less
(source)
Also, you can check under which operating system your container is running:
cat /etc/*-release
(source)
In my case, it was Debian.
And still being in the Docker container terminal, we can find out under which user the Apache is running:
ps aux | egrep '(apache|httpd)'
(source)
So we see that our project files belong to the user root, belong to a group with ID 998, which clearly corresponds to the group vboxsf on the VM but is not defined inside the container. And Apache runs under the user www-data.
So inside our Dockerfile, we need to add a user group for the group ID we found out and add the user under which Apache is running to this group. To do that you can add the following 2 lines to the file Dockerfile:
RUN groupadd -g 998 vboxsf
RUN usermod -a -G vboxsf www-data
and then restart the container.
Just for reference: the Dockerfile from section 1 of the article on XDebug with Docker will look like this now:
FROM wordpress:6.7.2-php8.4-apache

# Install packages under Debian
RUN apt-get update && \
    apt-get -y install git

# Install XDebug from source as described here:
# https://xdebug.org/docs/install
# Available branches of XDebug could be seen here:
# https://github.com/xdebug/xdebug/branches
RUN cd /tmp && \
    git clone git://github.com/xdebug/xdebug.git && \
    cd xdebug && \
    git checkout xdebug_3_3 && \
    phpize && \
    ./configure --enable-xdebug && \
    make && \
    make install && \
    rm -rf /tmp/xdebug

# Copy xdebug.ini to /usr/local/etc/php/conf.d/
COPY files-to-copy/ /

# Since this Dockerfile extends the official Docker image `wordpress`,
# and since `wordpress`, in turn, extends the official Docker image `php`,
# the helper script docker-php-ext-enable (defined for image `php`)
# works here, and we can use it to enable xdebug:
RUN docker-php-ext-enable xdebug

# This block is necessary only if the project folder is shared with Guest Additions:
# 1. Add the group vboxsf.
# 2. Add the user www-data to the group vboxsf.
# It will give Apache full permissions in the mounted directory.
RUN groupadd -g 998 vboxsf
RUN usermod -a -G vboxsf www-data
Of course, this should be applied in the local development environment only. Anything like this would be very insecure for a server accessible from the Internet.
4.2 How to Share a Folder on an Ubuntu 20.04 Virtual Machine Using Samba Server
In the previous section, we created a folder on the host machine and shared it with the guest machine. Here, we’ll do the opposite. We’ll take a folder on an Ubuntu 20.04 virtual machine (guest machine) and share it with the host machine. We will use the Samba server for this.
Of course, everything described in this section should be used in the local development environment only. You would need more secure settings if you use Samba for anything other than local development.
1. Install the Samba server. In the console of your Ubuntu 20.04 VM run:
sudo apt-get install samba
Check where samba has been installed:
whereis samba
2. Find out your network workgroup:
- Windows 10: System > About, click System info
- Windows 7: Control Panel > System and Security > System
- macOS: Preferences > Network, select your connection on the left (e.g. Wi-Fi), click the button Advanced on the bottom right, in the dialog that opens go to the tab WINS (which stands for Windows Internet Name Service) (source)
3. Edit /etc/samba/smb.conf. Under section [global] change the line (if your workgroup is not WORKGROUP, use your workgroup name instead):
workgroup = WORKGROUP
Under the same section [global] add the line
security = user
Also, if your host machine is a Mac and you do not want macOS to create service files starting with ._ or files like .DS_Store, you can add the following 2 lines under the same section [global]:
veto files = /._*/.DS_Store/
delete veto files = yes
(source)
4. Add the following block at the very bottom of /etc/samba/smb.conf:
[share98]
    comment = Ubuntu File Server Share
    path = /var/www
    browsable = yes
    guest ok = no
    read only = no
    create mask = 0755
    force user = root
Please notice: 1) I’ve used share98 as the name of the share (in the line [share98]). You could choose a different name of course. Personally, I like to name my shares after the IPs on which my VMs are running (this VM is on IP 192.168.1.98). So that I could see at once which share is which.
2) The shared path on the VM is /var/www
3) guest ok = no means that only authenticated users can connect.
You can change this to yes while configuring the share. And in the case of yes, anyone would be able to connect, which is very insecure, of course.
4) force user = root means that everyone who connects will have the root access. This is extremely unsafe of course. So I use this setting only in my local development environment – nowhere else. In general, you could use:
    force user = <user>
    force group = <group>
instead (substitute the required user and group in place of <user> and <group>).
5. Set your SMB user password:
smbpasswd -a root
Or if your user is not root (which is more secure of course):
smbpasswd -a mysmbuser
6. Restart the corresponding Ubuntu services:
service smbd restart
service nmbd restart
7. Now the shared folder will be available on your network. If you are on Mac, you could mount it like this (the local directory where you mount the share must already exist and preferably be empty):
mount_smbfs //mysmbuser@192.168.1.98/share98 /path/to/a/local/directory/
Though in this case, you will be asked for a password for your SMB user mysmbuser.
Or you could set the password right on the command line in the terminal (which is insecure of course):
mount_smbfs //mysmbuser:mysmbpassword@192.168.1.98/share98 /path/to/a/local/directory/
Later you could unmount the directory like this:
umount /path/to/a/local/directory/
Normally I create 2 files with short names in my user home directory (e.g. ~/mnt and ~/umnt). The first contains the command for mounting the network share. And the 2nd contains the command for unmounting it. Running those files instead of typing the mount/umount commands each time saves time.
Additional reading:
Ubuntu documentation for Samba file server
5. Additional Performance Improvements
What we’ve done so far should make your VM work without performance problems already. At least this is how it worked for me.
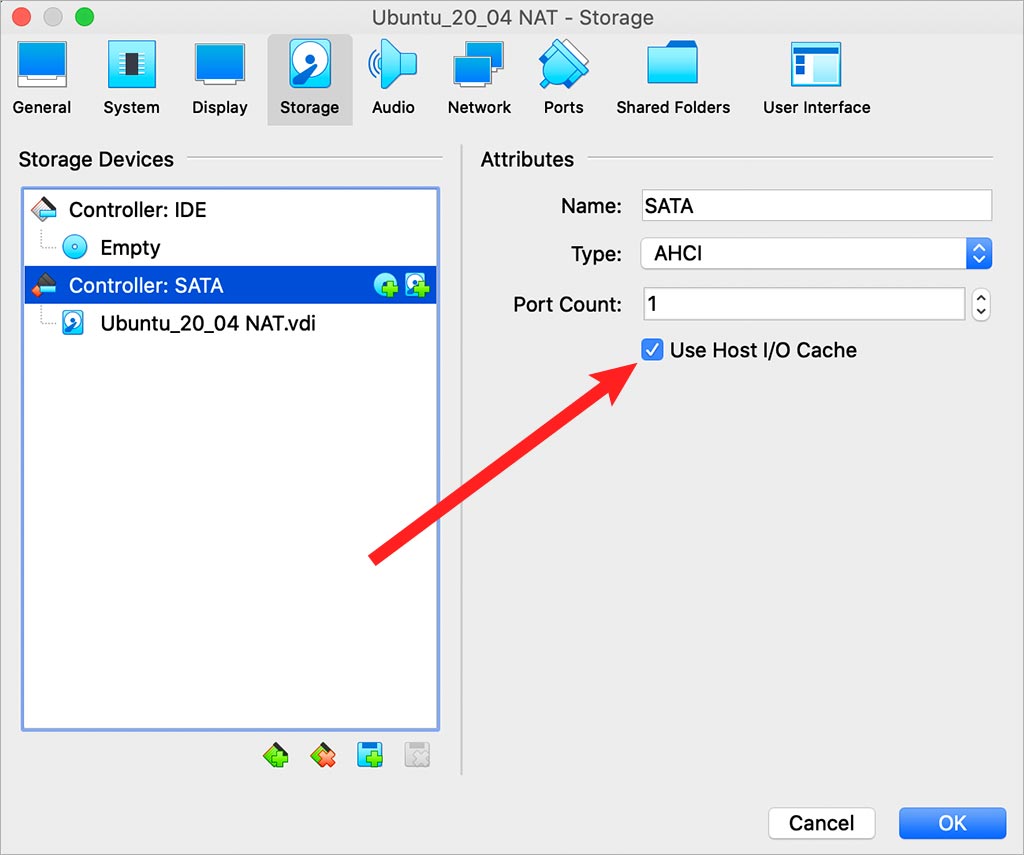
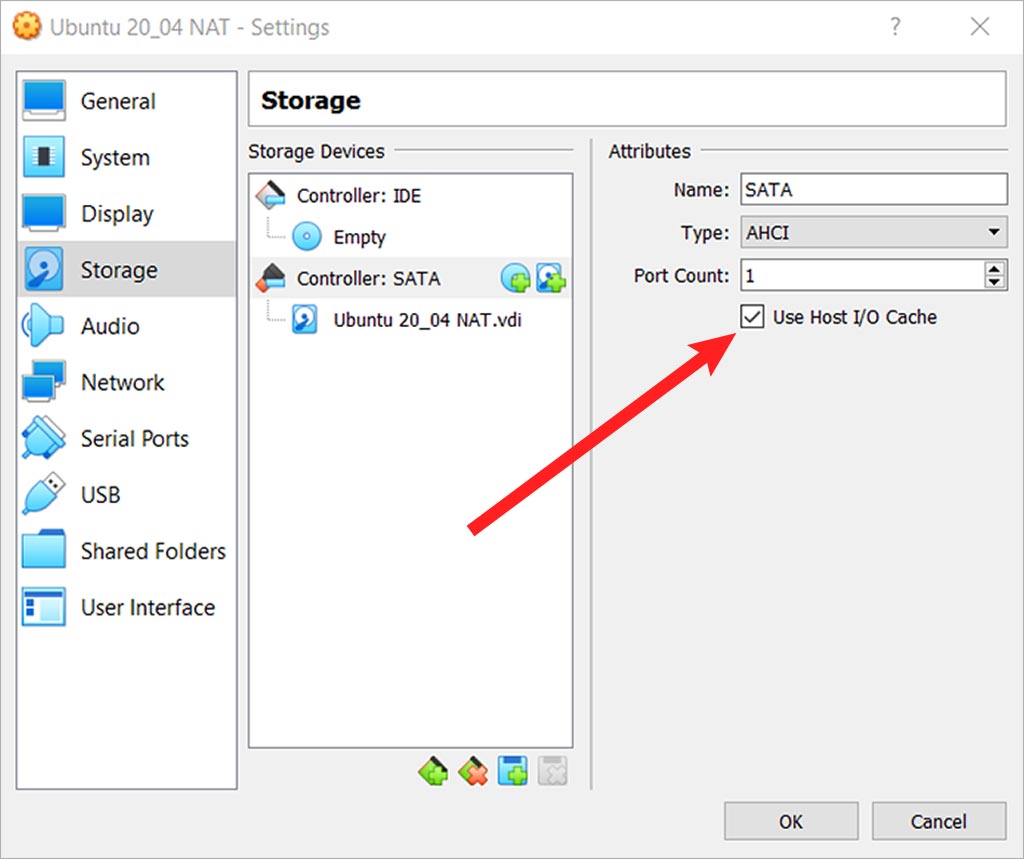
But if you wish to improve the virtual machine disk performance a little bit, you could try the approach described in this article.
What is proposed in that article is to go to ![]()
Settings > Storage, select the Controller: SATA and check the checkbox Host I/O Cache:
macOS:
Windows:
6. Deploy Your Website Locally
Probably the simplest way to deploy your website for development locally is to use Docker. Please see this article on how to do that for a WordPress site. The article describes how to set a development environment with Docker for a WordPress site. And how to add XDebug to the Docker image (which would certainly be useful for development).
Or you could set LAMP and deploy a website locally in the traditional way. This process is pretty straightforward and out of the scope of this article.
Conclusion
Why have I written all this in the first place? I’ve been using Oracle VirtualBox for web development for many years. But recently I’ve started getting performance problems with my virtual machines. And the more recent versions of the VirtualBox I used, the worse everything worked. I’ve ended up with some of my web pages sometimes loading instantly but sometimes after 10 seconds delay. The work has become intolerable.
The worst performance problems were on virtual machines where I used Docker containers.
At that time I was on VirtualBox 6.1.12, the host machine was running macOS Catalina, my virtual machines were on Ubuntu 20.04 and the VirtualBox Guest Additions were not installed. So I had to downgrade from VirtualBox 6.1.12 to 6.1.2, use 2 network adapters (NAT + Host-only), and install VirtualBox Guest Additions. This solved the performance problems for me.
Currently, on Mac, I’ve upgraded the operating system to Big Sur 11.1. VirtualBox 6.1.2 stopped working for me. So I am using the most recent version of VirtualBox (6.1.16 at the time of writing) currently. Also, I keep using 2 network adapters (NAT + Host-only). And VirtualBox Guest Additions are installed of course.
In my experience, it’s very important to configure your virtual machines properly right from the start. Or you could get a lot of misconfiguration or performance problems. Which could make work a nightmare.
I hope this article would be useful for web developers, webmasters, or any enthusiasts who need to use VirtualBox for web development.
If you have any questions or comments, I would be very glad if you posted them below.
All my articles are always a work in progress. So, if you have anything to say, please do not hesitate to do it. Your comments will be highly appreciated.
Thanks for reading to the end!
Thank you so much for this! You kept me from pulling my hair out :). Many blessings and a Happy 2021 to you.
Thanks for the good words! I really appreciate them. And Happy 2021 to you too!!!
This is a FANTASTIC write-up! Thank you for putting this together -really. This is the stuff that I have to manually run through and figure out on my own every time I want to setup a new VM (my last VM is from 2007). As such, I’ve been putting it off.
Thank you again!
Thank you very much for the good words! I really appreciate them. I am very glad to hear you’ve found the article helpful.
Thanks!
Thank you very much, it was really helpful.
Thanks for your comment! I am really glad to hear the article was helpful.
Thank you very much for this information.
Thanks for the good words! I really appreciate them.
Thanks for writing this up. I’m running Ubuntu 20.04.3 LTS and it had Network Manager in the configuration file. I went to it and setup my static IP there. Everything worked fine and going now. I can ping the VM server from the hosts and from other computers on the network.
My goal: Create a GIT Repos on this sever so I can do some learning of different programming languages, yet keep a backup of my source code as I go through changes.
Thank you very much for such a good comment! I really appreciate it.
Good luck to you with your project!
Thank you, thank you, thank you! I tried to use bitnami, which was a total disaster. When I found your site I was a bit overwhelmed at first by how complex the process was, but I persevered, (with help from a couple other web sites) and have finally succeeded in getting my dev environment set up. Now I just need to get Joomla installed!
Thanks for you comment! I am really glad to hear the article was helpful with setting up your dev environment.
Hi,
Thanks for a detailed explanation, i am not a very advanced developer but took a few goodies to setup my vbox. If you allow me, I am not able run NPM at all all the commands like init install, start and build fails (some kind of EPERM error). I had setup my shared folder in home directory and then as you had done in the var directory. But none of them worked and I tried to search a lot but nothing seems to resolve my problem, i am not sure what am i doing wrong here could you please advise
thanks again
Thanks for your comment!
It does not look like a virtual machine (VM) problem to me. According to your question, you probably have a problem with npm. Not with the VM.
When I work with npm, I install nvm first. It allows me to work with different Node.js (and corresponding npm) versions. And switch between them easily. If you have a problem with one version, you could try another.
Also, before installing anything, I usually create a snapshot of my VM in the Oracle VM VirtualBox Manager. So, if anything does not go as planned, I could always revert my VM to the previous state.
Hi Thanks,
I am not sure anyone else is having this problem. A couple of days back after logging into my VM there was normal prompt of updates which i did as usual. But after the that the VM take about 10 mins to boot and has reduce almost 50% in its performance capacities. I tried every possible solution most of them related to disabling hyper-v which is the cause of a Turtle icon in the status bar instead of the regular V. But the problem just does not go away if i total disable the vt-d form the bios it just doesn’t work at all and throws “Guru meditation” error whatever that might be.
Would like to know if this is for real ? as i had no problems at all before the update. Can anyone show me a way thanksss….
Hi!
Thanks for your comment!
After getting your comment, I upgraded the VirtualBox to version 7.0.14. I also upgraded the VirtualBox Extension Pack. I do not see any downgrade in performance. VMs boot and work normally.
My host machine is on Windows 10 Pro. And the VMs are mostly running Ubuntu (different versions).
Hi Thanks again for a very prompt reply,
My host is Windows 11 pro and all machines run Ubuntu. The prompt of updates was within the machine that is by the Ubutnu software updater not the actual VirtualBox version update if that makes sense and then on restarting this problem persisted.
But then I created a new machine with version 7.0.14. that seems to run fine but this means i have to set up all the four machine from scratch. That seems very annoying and the thing is that none of the solution on the VirtualBox forums or the net seems to work.
thanks & Regards
Hi! Thank you very much for sharing your solution!
If I had a situation like that, I would try exporting an old virtual machine and then importing it back on this computer, and, if it does not help, on some other computer. I would not delete the existing virtual machine, till I found a working solution.
Since your new virtual machines work fine, maybe this export and import would help. Though, since I can not reproduce the problem, I can not be sure about it, sorry.
Hi Sergey,
Thanks you, but with a few tweaks and upgrading the VBox and the Extension Pack to 7.014 and then upgrading the guest editions helped and its working perfect now. While we are at it can i ask if you have got an article on setting up VS-code for WordPress development. I mean i have a setup but sometimes my JS and PHP files does not do the linting and formatting task to perfection, even if you can suggest some extension usage or some tweaks in my settings.json file would be great, sorry for bothering
Thanks & regards
keki
Hi!
Thanks for sharing this information! Now people who have a similar problem, will know they need to upgrade VirtualBox and all relevant packages as a solution.
No, sorry, I do not use VS Code. I use PhpStorm for web development. And I am quite satisfied with it.
However, I’ll consider adding an article about VS Code since I’ve been asked about it more than once already. Thanks for the idea!