![[Docker] How to Set up Postfix Containers and Send Emails From WordPress in Docker](https://www.wpdiaries.com/wp-content/uploads/2020/07/smtp-150x150.jpg)
![[VirtualBox] Configure an Ubuntu 24.04 / 22.04 Virtual Machine for Web Development (Complete Guide)](https://www.wpdiaries.com/wp-content/uploads/2020/09/local-development-environment-150x150.jpg)


The official Docker WordPress image is minimal. It does not have any MTA (Mail Transfer Agent) like Exim4 or Postfix installed by default. So you’ll be unable to send emails from your WordPress Docker container without using an external SMTP relay service.
This article describes several solutions for adding Postfix to your system. So, you’ll be able to send emails from WordPress using SMTP.
Of course, this is a bare-bone article. It is very minimal. For example, it does not consider security problems. You must check the Postfix documentation and security-related articles to secure the system. Here we consider only some minimal functionality to make your SMTP e-mail sending functionality work at all.
Contents
1. Setting up an SMTP Server in a Postfix Docker Container with DKIM
In this section, we’ll create a Postfix docker container based on the image catatnight/postfix. This image supports DKIM verification.
This solution is used here on wpdiaries.com. All WordPress automatic email notifications and all emails from the contact form are sent to my email address with this functionality.
Let’s add the file /opt/projects/mail/compose.yaml:
services:

  mail:
    container_name: mail-postfix
    image: catatnight/postfix
    restart: always

    expose:
      - "25"

    environment:
      maildomain: wpdiaries.com # replace with your own server name instead of example.com
      smtp_user: admin:pwd # username and password for SMTP

    volumes:
      - /opt/projects/mail/volumes/domainkeys:/etc/opendkim/domainkeys
#      - /opt/projects/mail/volumes/log/supervisor:/var/log/supervisor

    networks:
      mail:
#        ipv4_address: 172.30.0.2

networks:
  mail:
    name: mail # or it will be created as mail_mail (where the prefix mail_ is the <current directory name>_)
    ipam:
      driver: default
      config:
        - subnet: "172.30.0.0/24" # 172.30.0.0 – 172.30.0.255
Run the container:
docker compose up -d
Now we need to generate public and private keys for DKIM. The procedure of generating files (though not for a Docker container) is described in detail in this article.
Let’s enter the running container terminal:
docker exec -it mail-postfix bash
Generate the keys in the directory /etc/opendkim/domainkeys inside the container (replace example.com with your mail domain name):
cd /etc/opendkim/domainkeys
sudo opendkim-genkey -s mail -d example.com
sudo chown opendkim:opendkim mail.private
-s defines a selector here. It could be any string. Often the current year is used as a selector. We used the word mail.
The command above will generate 2 files :mail.txt – our public keymail.private – our private key
and will change the owner for the private key file.
Exit the container mail-postfix:
exit
Now the file on our mounted (in Docker Compose) volume /opt/projects/mail/volumes/domainkeys/mail.txt will contain something similar to this:
mail._domainkey IN TXT ( "v=DKIM1; k=rsa; "
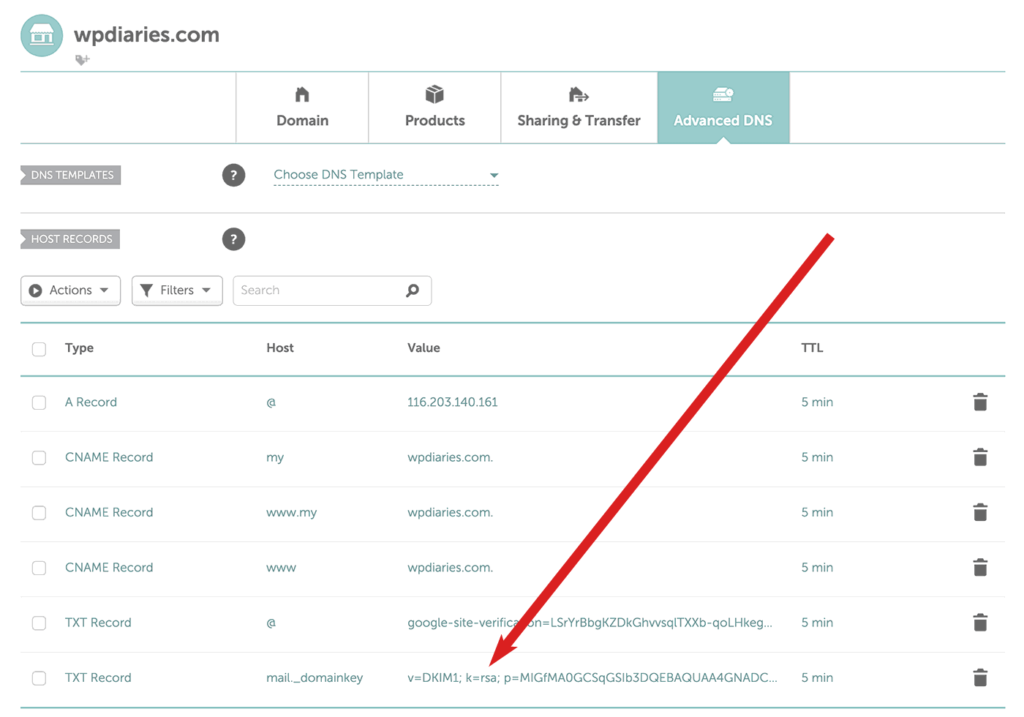
"p=MIGfMA0GCSqGSIb3DQEBAQUAA4GNADCBiQKBgQCvhz766AiMeVPzidwF+wXzDM6z+wt4g8pOR2VoxPwa4wfBL3A/lqNopbCBMBpDB6mEDzDUmWMw8r6NjKRulBMqE5tq470nvaNR05w7MiM3RjrhSwVjPDMhA46HNOSSf26hTrtnMqpuNCIidGpH3W132h6sGtc6YuMTByKDZe77+QIDAQAB" ) ; ----- DKIM key mail for example.comSo we will have to add this TXT record with the following parameters on the DNS server for our mail domain:
Record type: TXT
Host: mail._domainkey.example.com
Value: v=DKIM1; k=rsa; p=MIGfMA0GCSqGSIb3DQEBAQUAA4GNADCBiQKBgQCvhz766AiMeVPzidwF+wXzDM6z+wt4g8pOR2VoxPwa4wfBL3A/lqNopbCBMBpDB6mEDzDUmWMw8r6NjKRulBMqE5tq470nvaNR05w7MiM3RjrhSwVjPDMhA46HNOSSf26hTrtnMqpuNCIidGpH3W132h6sGtc6YuMTByKDZe77+QIDAQAB
E.g. the DKIM TXT record for wpdiaries.com on the Namecheap DNS server looks like this:
Then we’ll need to restart our docker container mail-postfix:
cd /opt/projects/mail/
docker compose restart
For more detailed information about adding a DKIM key (but without Docker) please see this article.
2. Configuring Docker WordPress Container to Use Postfix
In the previous section, we’ve considered how to install Postfix in a separate Docker container. The Postfix container (it had the name mail-postfix) creates the network mail.
Now, we need to add the network mail to the compose.yaml files of our WordPress projects where email-sending functionality is required:
services:

  wordpress:
    image: wordpress

    # More configuration options here
    # ...

    networks:
      mynetwork1:
      mynetwork2:
      # We are adding the network `mail` here:
      mail:


networks:
  mynetwork1:
  mynetwork2:
  # We are adding the network `mail` here:
  mail:
    external: true  # which also means this network must exist already before this container is run
    name: mail  # the name is nnecessary or the container will look for currentdirectoryname_mail
These WordPress containers will join the network mail. They do not create this network. So the network mail must exist before you start these WordPress containers (for example, our Postfix mail container must start first).
3. Configuring Mail in the WordPress Admin Panel
In user-defined networks (we have the network mail here) automatic service discovery exists. It means that containers can communicate not only by an IP address but by a container name too.
It is easy to check (it is better to run such a check in the development environment): If we have some container connected to the mail network, e.g. with the name my-wordpress-container, we can log into bash of this my-wordpress-container like this:
docker exec -it my-wordpress-container bash
Then in the container bash we can install the necessary packages and run the ping command (the example is given for a container built on the official wordpress image that runs Debian):
apt-get update
apt-get install iputils-ping

ping mail-postfix
You’ll see that you can ping the container mail-postfix by its container name from another container running in the same network mail.
So, in our case, since the Postfix container name is mail-postfix, we’ll use this name instead of localhost in the mail configuration.
If you use e.g. Post SMTP plugin for mail configuration, the outgoing mail server configuration screen in the plugin settings could look like this:

Of course, we could set a static IP address for the container mail-postfix (see the commented line for ipv4_address in the example above) and use this IP address instead. But using the container name is probably more convenient.
Also in the wizard, if we have chosen to build on the image catatnight/postfix (please see section 1), we will need to enter the user name and password for the SMTP server (which we have set previously in the Docker Compose file).
If we build on the image tozd/postfix (please see section 5.1), we do not enter the password (authentication without a password is used there).
3.1. How to Check that the Mail Was Configured Correctly?
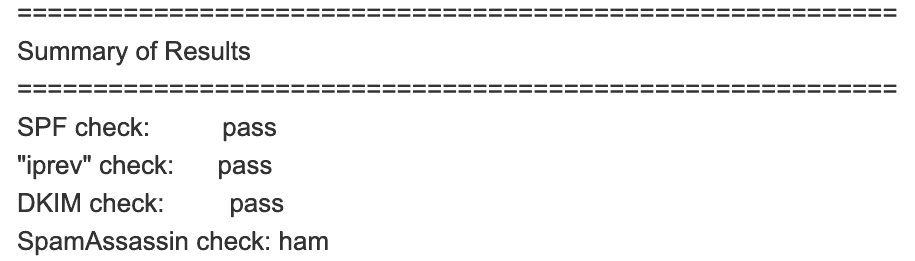
The plugin Post SMTP allows us to send a test e-mail. So, send an e-mail to the e-mail address check-auth@verifier.port25.com. You’ll get a response with the information if your e-mail has been set correctly and what could be improved to increase your mail deliverability. If everything is OK, the reply e-mail will contain the following lines:
4. E-mail Related DNS/rDNS Records
There are several mail-related DNS records. Some of them increase mail deliverability and some don’t.
For example, if you plan to work with your mail online, you would need a web mail client for it. You would need a subdomain where this mail client will be available. For example, mail.example.com. And you will need an A record added for such a subdomain at your DNS server. This record will be mail-related. But it does not influence your mail deliverability in any way.
An MX record is also not necessary for sending mail. If you plan to accept emails (for example, by having a POP3 or IMAP email server), you will need an MX record. But if you are only sending emails via SMTP (i.e., you do not accept e-mails on the server, only send them) you don’t need an MX record. An MX record does not affect outgoing mail delivery.
But you certainly need a PTR record. Please see this post for details.
Please keep reading for more details on mail-related DNS/rDNS records.
MX Record
We’ll consider an MX record here only because it is mail-related. You do not need an MX record for sending mail. You need it for receiving mail only. So if you need only email sending functionality, you don’t need to set this record. And can safely skip to the next section.
To check if your mail domain (or main domain if you do not have a special mail subdomain set) already has an MX record set for it, run (on Linux or under Mac):
dig MX example.com +short
There are some special cases when you could have more than 1 MX record for 1 domain. But usually, you do not need it. So if you already have an MX record, normally, there is no need to add another one. 2 mail providers will be unable to handle mail for 1 domain at the same time anyway (only 1 of them will do it at a time).
Adding an MX record is very straightforward. Normally you could find a help page for your DNS server describing how to do that. For example, adding an MX record at Namecheap DNS server is described here.
An example of setting an MX record on the GoDaddy DNS server can be found here.
PTR record
A PTR record (other names: a pointer record, a Reverse DNS record, an rDNS record) is used for reverse DNS lookup. In mail functionality, this is the record by which a mail server (at the mail receiving side) finds your sender mail server domain name by its IP address. You need to add this record if you are sending e-mails and you want to increase mail deliverability.
Normally, you don’t set a PTR on your DNS server. You set it at your IP address provider (usually your hosting company). You’ll need to google on how to set the PTR record for your servers at your hosting company. For example, setting a PTR record on Hetzner is described here and here, for DigitalOcean it is described here, etc. Normally you can easily find how to set the PTR record at your hosting company servers by running a Google query like “<my hosting company name> set ptr record”.
You can check the PTR record you have set for your server currently (please substitute your server IP address in the commands below):
under Windows:
nslookup 116.203.140.161
under Linux and under Mac:
dig -x 116.203.140.161 +short
Or use an online reverse lookup tool like MXToolbox, Hacker Target,
To increase your mail deliverability, set the PTR record for your sending mail server correctly (for example, for this site it is set for wpdiaries.com since I did not need a separate mail-related subdomain here).
For more information on PTR records please see this article on namecheap.com.
SPF record
An SPF (Sender Policy Framework) record is necessary to decrease e-mail spoofing (a technique when spammers send SPAM e-mails using your domain e-mail in the FROM: field).
You can use a wizard like app.domainhelp.com/spf-wizard to help you to form an SPF record.
For example, for wpdiaries.com I checked if I had an SPF record already:
dig TXT wpdiaries.com +short
And found out NameCheap (which provides registrar, DNS and e-mail forwarding services for my domains) had one generated for me already:
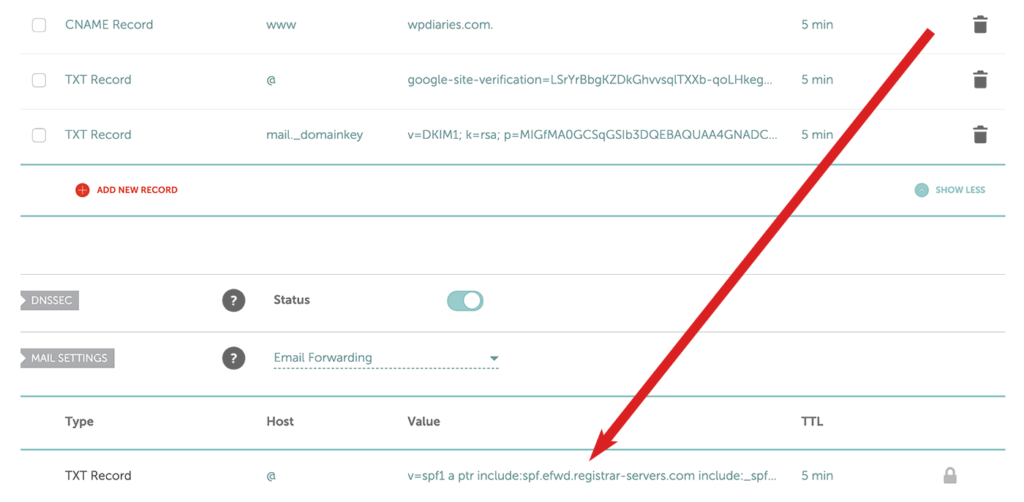
v=spf1 include:spf.efwd.registrar-servers.com ~allSo using spfwizard.com and taking into account that sometimes I reply via the Google SMTP server (and I did not want my e-mails to be rejected), for wpdiaries.com I have generated the following SPF record:
wpdiaries.com. IN TXT "v=spf1 a ptr include:spf.efwd.registrar-servers.com include:_spf.google.com ~all"After forming an SPF record for your domain, you’ll need to add the record as a usual TXT record at your DNS server.
For example, the SPF TXT record for wpdiaries.com on the Namecheap DNS server looks like this:
Then you can use one of the SPF record validators (for example, this one) to check if your SPF record exists and has the correct format.
You could also check this article for information about SPF records. I think it is pretty useful.
DKIM record
The DKIM (DomainKeys Identified Mail) is a digital signature added to your e-mails.
You need this record to increase mail deliverability.
For example, Google requires that emails delivered to Gmail be signed with DKIM or SPF (bulk senders must have DKIM, SPF, and DMARC).
We considered adding a DKIM record for Postfix when discussing the use of the image catatnight/postfix right above.
With DKIM, your mail server adds an SMTP header to outgoing emails. For instance, here, on wpdiaries.com, a header like this is added:
DKIM-Signature: v=1; a=rsa-sha256; c=relaxed/simple; d=wpdiaries.com; s=mail; t=1729010307; bh=shdi2eW0cu/bdwtdCJuaazqVxtJPDxrh3NX0dkEAOn8=;
To verify that the signature is correct, you can use the method discussed above.
You can find more information on the DKIM record in this, this, this, and this tutorials.
5. More Examples of Setting up an SMTP Email Server
5.1 Setting a Postfix Docker Container without DKIM
I prefer to set up a Docker Postfix container with DKIM as described in section 1.
So the content below is for educational purposes only. It is just one more example of setting up a Postfix container.
Update: When I was last checking the functionality of this solution on 30 Sep 2024, the Docker container was exiting with code 3. I was unable to make it work. So, please see section 1. The solution in section 1 worked fine for me on 30 Sep 2024, when I was testing.
In this section, we’ll create a Postfix docker container based on the image tozd/postfix. This solution does not support DKIM verification (digital signature for your e-mails). If you need DKIM, please section 1.
Let’s create the directory /opt/projects/mail:
mkdir /opt/projects/mail
cd /opt/projects/mail
We’ll need one more directory for our container:
mkdir volumes
mkdir volumes/spool
mkdir volumes/log
Now let’s add the file /opt/projects/mail/compose.yaml:
services:

  mail:
    container_name: mail-postfix
    image: tozd/postfix:alpine-38
    restart: always

    expose:
      - "25/tcp"
      - "465/tcp"
      - "587/tcp"

    environment:
      MAILNAME: example.com # replace with your own server name instead of example.com
      MY_NETWORKS: 172.17.0.0/16 127.0.0.0/8 192.168.0.0/16 # my mail server happened to be in the 192.168.0.0/16 so I had to add this network
      MY_DESTINATION: localhost.localdomain, localhost
      ROOT_ALIAS: admin@example.com # replace with your e-mail address

    volumes:
      - /opt/projects/mail/volumes/spool:/var/spool/postfix
      - /opt/projects/mail/volumes/log:/var/log/postfix

    networks:
      mail:

networks:
  mail:
    name: mail # or it will be created as mail_mail (where the prefix mail_ is the <current directory name>_)
Also, it is a good idea to check the IP range (subnet) for the network mail. To do that, on the host machine run:
docker inspect mail
In my case the subnet was 192.168.128.0/20. So I have added 192.168.0.0/16 to the MY_NETWORKS variable to avoid problems with such networks. Without it, I was getting the error “Relay access denied” when trying to send an e-mail from my WordPress container.
Another way is to set the subnet for the network mail explicitly. See the ipam section in the Compose documentation (ipam – IP Address Management – uses the default driver here). The file /opt/projects/mail/compose.yaml for this case could look like this:
services:

  mail:
    container_name: mail-postfix
    image: tozd/postfix:alpine-38
    restart: always

    expose:
      - "25/tcp"
      - "465/tcp"
      - "587/tcp"

    environment:
      MAILNAME: example.com # replace with your own server name instead of example.com
      MY_NETWORKS: 172.16.0.0/12 127.0.0.0/8
      MY_DESTINATION: localhost.localdomain, localhost
      ROOT_ALIAS: admin@example.com # replace with your e-mail address

    volumes:
      - /opt/projects/mail/volumes/spool:/var/spool/postfix
      - /opt/projects/mail/volumes/log:/var/log/postfix

    networks:
      mail:
#        ipv4_address: 172.30.0.2 # there is no need to set the container IP in the network `mail` explicitly,
                                  # but you can do it if you wish

networks:
  mail:
    name: mail # or it will be created as mail_mail (where the prefix mail_ is the <current directory name>_)
    ipam:
      driver: default
      config:
        - subnet: "172.30.0.0/24"
I did not assign a static IP to the mail-postfix container in this example. If it is necessary for some reason, you could do it with the option gateway as described in the official Compose documentation for IPAM (IP Address Management) configuration.
One more way to deal with the network IP range assignment problem is to explicitly set the IP address pool in which Docker is allowed to create networks. This approach is described in this article. And it consists of setting the default address pool in the file /etc/docker/daemon.json.
Since the compose.yaml above creates the network mail, we should start the container before any other container that will join this network (for example, before our WordPress container):
docker compose up -d
To stop/remove the container we could use:
docker compose down
5.2 Adding Postfix Directly to the Docker WordPress Image
This section has been added for educational purposes only. So you can safely skip it if you wish. You shouldn’t add Postfix directly to the official wordpress image. Why? Because it is not recommended to have more than 1 responsibility for 1 docker container. Please see the section Decouple applications in the official documentation on Docker best practices.
So please do not use the approach described in this section. It is given here for educational purposes only.
Still, if you are interested in this subject, you could use a Dockerfile like this:
FROM wordpress:6.7.2-php8.4-apache

# Install packages under Debian
RUN apt-get update

# Install Postfix (replace wpdiaries.com with your own domain name)
RUN ["/bin/bash", "-c", "debconf-set-selections <<< \"postfix postfix/mailname string wpdiaries.com\""]
RUN ["/bin/bash", "-c", "debconf-set-selections <<< \"postfix postfix/main_mailer_type string 'Internet Site'\""]
RUN apt-get install --assume-yes postfix

# Uncomment the following line if you need inter-container communication on port 25
#EXPOSE 25

COPY entry.sh /
RUN chmod +x /entry.sh

ENTRYPOINT ["/entry.sh"]
Where entry.sh is a script like this:
#!/bin/bash

service postfix start

# Similar to how Apache2 is run in the official wordpress image Dockerfile:
/usr/local/bin/docker-entrypoint.sh apache2-foreground
Then in compose.yaml instead of the image directive you will need to use the build directive like this:
    build:
      context: .
Please notice that in our entry script entry.sh, first we run Postfix and then we execute a command similar to the ENTRYPOINT directive of the official wordpress image Dockerfile. We do it like this because according to the official documentation on ENTRYPOINT and on CMD, if multiple such directives exist, only the last one is executed. And so, despite the wordpress image (on which this image has been based) already has an ENTRYPOINT directive, this first directive will be ignored. So we need the ENTRYPOINT command in our Dockerfile to execute all we need (in our case, to run Postfix) plus run a directive similar to the one from the official wordpress image Dockerfile.
For more information on Dockerfiles please see the Dockerfile reference.
Again, having Postfix right inside the wordpress container is not recommended. This section of the article is given for educational purposes only. Please see the sections above instead.
5.3 Sending Emails Using Host Machine SMTP
Some people suggest configuring Postfix on the host machine. Then you could send e-mails from Docker using your host machine MTA (Mail Transfer Agent). This solution is discussed here.
The reason behind such a solution could be that you could possibly need some sending functionality on your host machine anyway (maybe some service or automatic system notification e-mails). In this case why set one more SMTP server in Docker.
But if you, like me, do not need to send e-mails from your host machine, then I would keep the SMTP functionality inside a Docker container.
Personally, I prefer to install as much functionality as possible in Docker containers. It simplifies deployment really much. And looks a little bit cleaner to me. But the final decision is up to you of course.
Conclusion
I hope you’ve enjoyed the article.
If you do not need to send mail from WordPress in Docker, but all you need is a simple solution for forwarding your domain mail, please check this article.
Do you have any questions?
Or maybe you have any ideas on what I could add to the article?
Or maybe you could tell me which subjects you’d like to read about in future articles?
In this case, please do not hesitate to post a comment below.
I would be very glad to hear from you.
Like!! I blog quite often and I genuinely thank you for your information. The article has truly peaked my interest.
Thanks for the good words! I’m really glad you’ve found this information interesting.
Thanks for the post. Docker WordPress on a VM relaying through an Exchange mail server . Nice to see lots of options for solving email issues.
Probably the most helpful piece for me was Post SMTP. The SMTP plugin I was using was probably fine, but Post SMTP displays error messages when your test mail fails to send, which helped me track down that I had forgotten to whitelist my WordPress VM in Exchange, so it was refusing to forward mail outbound.
Solving the problem is 5% of the effort; troubleshooting is 95%.
Thank you! Yes, I agree completely. For me, troubleshooting often also takes much more time than actually correcting the code. Thanks for your comment!
Thanks so much for this. I’m new to Docker and am trying to move several WordPress sites into containers on one host. It’s going well, be I have noticed that WordPress is unable to send mail. This blog post is right on the mark, and you only published yesterday – how fortunate for me!
Many thanks, it is appreciated.
Mike.
Thank you very much for your comment! I am really glad to hear the article has been helpful to you. I also have several sites (most in WordPress) on one host. I find it very convenient. E.g. it’s very easy to use different versions of PHP, MySQL, etc. on different sites when necessary. And all this on one host. Or e.g. I estimate it would take just about 30 minutes to relocate all these sites together to another hosting company. If this one ever has technical issues. ?
Thanks for the kind words! And I wish you the best of luck on your project!
This is hands down the most informative post I found (I was looking for hours and even days) pulling my hair out trying to get mail sent through my traefik-nginx-wordpress-redis docker containers on a Digital Ocean VPS. I am configuring tis right now and this is an amazing start and hopefully final fix for this perplexing issue and just published right when i started looking into this issue. I hope this post stays since it is killer instructions.
Thank you very much for the good words! I really appreciate them.
Hello, thank you for your article.
Just a simple question, if I (like you) have several wordpress containers on the same host, do I have a single catatnight/postfix container for all wordpress containers or are there as many catatnight/postfix containers as there are wordpress containers?
Currently I use juanluisbaptiste/postfix for 1 wordress container, so for 5 wordpress I have 5 times the postfix, is there a solution with only 1 smtp/postfix container for all wordpress containers?
Thank you
Hello.
Thanks for your comment.
I have one (the same) catatnight/postfix container for all my sites currently. I just added all my WordPress containers to the network mail where this only catatnight/postfix container is running (each my WordPress site is actually added to several networks – not just mail – and all these networks are responsible for different things) – please see Section 2. My sites are located on the same server in different docker containers. But if you use DKIM verification with this single catatnight/postfix container, it will be valid for 1 your domain only. You will be able to send mail from all your sites. But the DKIM record will be valid for 1 of your sites (domains) only.
So, if your sites are located on different domains and if you want to have a valid DKIM verification for all of these domains, you could need several catatnight/postfix containers running. And configure each of them for its own maildomain. And with its own DKIM verification keys.
Also, having a separate catatnight/postfix with its corresponding separate network for each WordPress container could be possibly better for security considerations. I think it could be better not to have a single one network where each of your WordPress containers will have an IP address assigned to it. Maybe I am a little bit paranoid about such things. But I think in the future I will have different mail-related networks for different WordPress projects.
Really useful article. Thank you very much for taking the time to put this together.
Thanks for the good words! I really appreciate them.
I’m very glad to hear you’ve found the article useful. Thanks.
In docker-compose yml file, the tag is missing :
image: tozd/postfix:
List of tags :
tozd/postfix:ubuntu-xenial
tozd/postfix:ubuntu-bionic
tozd/postfix:ubuntu-trusty
tozd/postfix:alpine-38
There is no “latest” tag. so the default value isn’t working.
Thanks for telling me!
Previously tozd/postfix used to have the tag latest. My mail server in docker has been working based on it for about 1 year. I had to explicitly remove the docker image for tozd/postfix to reproduce the error when testing now. I’ve replaced it with tozd/postfix:alpine-38 in the examples in the article.
Thank you for the article! I have followed all the instructions and it seems to work. With the mentioned plugin I get the message “Your message was delivered (19 ms) to the SMTP server!”. Here is my question: This means, that my wordpress container has successfully communicated with my postfix container. But how to configure the postfix container that this message should actually be send out to the recipient of the test email? Using wireshark I do not get any traffic on port 25 during the test email. Does the post fix container need to be configured on top of this tutorial? Container port to host port mapping? Or am I missing something here? Thanks.
Thanks for the good words!
At the time of writing this article, I’ve been checking the ways to use Postfix with WordPress described in this article. So, at that time, I tested the configurations described in the article. Currently, this very server uses the the catatnight/postfix image for a Postfix container as described in section 1.2 of this article. No, I did not do any additional port mapping.
If the e-mail sending functionality did not work for me, I would have checked the mail logs inside the Postfix container first. For catatnight/postfix, you could look at this thread for the information on how to do that. Normally it gives an idea of what is going on…
Hi
first of all, I want to appreciate this helpful article.
I’ve implemented postfix by catatnight/postfix image in separate container with dkim. but I cannot connect to this container. I got “Unable to connect to remote host: Connection refused” error. I can give more information about my .yml and config files.
thanks a lot
Hi! Thanks for the nice words!
This is strange. I keep using catatnight/postfix and it works fine for me. E.g. I use it on this site. This very container sent an e-mail notification to me about your comment.
Have you added the mail container network to your WordPress container as external? And are you connecting to the mail server from WordPress using the mail container name?
Hey, thank you so much for the great article, it has been a big help!
Thank you very much for the good words! I really appreciate them.
Would this work for a php. alpine image rather than wordpress image?
Thanks for your question.
I did not check it with PHP Alpine. But if you run Postfix in a separate Docker container, it should work. From PHP Alpine or from WordPress… If you have a separate Postfix container, any container on the same Docker network can talk to it.
Thank you for your reply.
My questions are:
1) you have a real domain name, not a dev domain like dev.example Would a local domain like this still work?
2) would the network config go under the php service?
1) I am using this container configuration on wpdiaries.com. Yes, it is a real domain. This is how I got a notification about your question to my e-mail just a few minutes ago.
For a local domain, I did not try it with this particular configuration, sorry. Most probably you would be able to send e-mails. But they may be rejected by gmail or other mail services…
Some time ago I sent a few testing e-mails from a VirtualBox virtual machine to my gmail e-mail address. And I was able to receive them despite the domain was not real… Still, that could change… They could always make rules more strict…
2) Yes, if your php service is going to communicate with the Postfix container, they must be in the same Docker network (the Postfix container we are talking about does not publish any ports for outside use). So you could give your php service access to the network, where Postfix is running, in basically the same way, as it was done for the WordPress container configuration here.
Thanks for your questions.
the nginx container fails to start only when the external mail container is running
Maybe it is worth running
docker ps -a
to find the container ID. And then
docker logs first-3-letters-of-the-container-ID
to see the messages output by the nginx container during the initialization. It could show the reason why the container did not start.