![[Docker] How to Set up Postfix Containers and Send Emails From WordPress in Docker](https://www.wpdiaries.com/wp-content/uploads/2020/07/smtp-150x150.jpg)
![[VirtualBox] Configure an Ubuntu 24.04 / 22.04 Virtual Machine for Web Development (Complete Guide)](https://www.wpdiaries.com/wp-content/uploads/2020/09/local-development-environment-150x150.jpg)

It is good to check WordPress themes and plugins locally before using them on production. You can do it quickly in a WordPress Docker container.
Contents
With Docker Compose you can create new WordPress containers in no time.
I precisely follow the process below when testing new themes and plugins before deploying them on production.
1. Install WordPress with Docker Compose
If you work on a Linux virtual machine, please see these steps for creating a complete local development environment.
My typical development environment is like this:
- I have a computer running Windows or macOS. It is called a host machine.
- On this host machine, I install VirtualBox.
- I create an Ubuntu virtual machine, configure it, and install Docker there.
- Then I can experiment with different products in Docker, including WordPress.
Let’s suppose your local test domain is test1.com. In the compose.yaml below, we use “test1”:
- as a database name
- as directory names
- as a part of Docker container names
Replace “test1” with any other string throughout the file as you see fit.
On your Linux virtual machine, place this file compose.yaml in the directory /opt/projects/test1/:
services:

  wordpress:
    container_name: wordpress-test1
    restart: always
    image: wordpress:6.7.2-php8.4-apache

    ports:
      - "80:80"

    environment:
      WORDPRESS_DB_HOST: db
      WORDPRESS_DB_NAME: test1
      WORDPRESS_DB_USER: mydbuser
      WORDPRESS_DB_PASSWORD: mydbpassword

    depends_on:
      - db

    volumes:
      - /opt/projects/test1/www:/var/www/html

    extra_hosts:
      - "test1.com:192.168.1.88" # Replace test1.com with your local test domain name
      - "www.test1.com:192.168.1.88" # Replace test1.com with your local test domain name

  db:
    container_name: mysql-test1
    image: mysql:8.3.0
    command: --default-authentication-plugin=mysql_native_password
    restart: always

    ports:
      -  "3306:3306"

    environment:
      MYSQL_ROOT_PASSWORD: mydbrootpassword
      MYSQL_DATABASE: test1
      MYSQL_USER: mydbuser
      MYSQL_PASSWORD: mydbpassword
      #MYSQL_RANDOM_ROOT_PASSWORD: '1'

    volumes:
      - /opt/projects_local/test1/mysql:/var/lib/mysql
      # To load a mysql dump (anyname.sql.gz):
      - /opt/projects/test1/docker-entrypoint-initdb.d:/docker-entrypoint-initdb.d
You can also download the test project, containing this compose.yaml, from GitHub.
In this file:
- If your local test domain is not
test1.com, replace the string “test1” with the name part of your test domain.
For example, If your local test domain is wpd88.com, use the file search in your IDE and replace “test1” with “wpd88” everywhere in compose.yaml above. - Replace “192.168.1.88” with the IP of your VirtualBox virtual machine.
Please notice: compose.yaml above differs in some places from the example given in the official documentation for the WordPress Docker image. The most important differences are:
- we publish MySQL port 3306 to the host machine
(publishing this port is useful for development, and should be avoided on production) - we set the root password for MySQL explicitly
(it is useful for development) - we publish the volume for
/var/lib/mysqlto a directory different from the project directory (explained below) - we use the directive extra_hosts (explained below)
- we have a volume for
docker-entrypoint-initdb.d(explained below)
Please notice: If you are a web developer and you need XDebug with WordPress:
Please click to see
To add XDebug to the WordPress image, you can use the image wpdiaries/wordpress-xdebug instead of the official Docker WordPress image wordpress. Please see the article on adding XDebug to the official Docker WordPress Image for more details.
In this case, instead of the line
image: wordpress:6.7.2-php8.4-apache
you’ll need:
image: wpdiaries/wordpress-xdebug:6.7.2-php8.4-apache
Plus, you’ll need to add the line to the environment of the container wordpress to tell XDebug the IP of your host machine:
    environment:
      XDEBUG_CONFIG: client_host=192.168.1.2 # change 192.168.1.2 to the IP of your host machine
Here, I was debugging from the computer with the IP 192.168.1.2.
Please see the complete compose.yaml in the article on adding XDebug to WordPress.
You can run the compose.yaml as:
cd /opt/projects/test1/
docker compose up -d
Also, see the commands:
The sections below give more details on the compose.yaml and on additional configuration.
2. Additional WordPress Configuration
This is optional. But, normally, I add the following lines to the end of WordPress .htaccess (/opt/projects/test1/www/.htaccess):
php_value memory_limit 1024M
php_value upload_max_filesize 256M
php_value post_max_size 512M
php_value max_execution_time 300
php_value max_input_time 300
Or you would be unable to upload some themes or big files. I had this problem with the Astra theme.
Please notice: The subdirectory www with WordPress files will be created inside /opt/projects/test1/ after you first run the Docker container.
Then you’ll be able to add those lines to /opt/projects/test1/www/.htaccess
3. How to Add a Domain to the File hosts
In the development environment, it is necessary to resolve our test domain name test1.com to our virtual machine IP address 192.168.1.88. It is done via files hosts:
hostson your host machine (Windows computer) – to allow you to open the site in the browser by the hostname.hostsin the Docker container – to make the hosttest1.comknown inside the Docker container. And, for example, allow WordPress REST API to work without problems.
3.1 File hosts on the Host Machine
You would need to add these lines to the file hosts on your host machine:
192.168.1.88    test1.com
192.168.1.88    www.test1.com
, where
192.168.1.88– is the IP assigned to the virtual machinetest1.comandwww.test1.comare hostnames
Replace 192.168.1.88 with the IP of your virtual machine and test1.com with your domain name.
Please see these detailed instructions on adding a domain to the file hosts on Windows, macOS, and Linux.
3.2 File hosts in the Docker Container
To add a domain name to the file hosts inside the WordPress Docker container, it is necessary to use the directive extra_hosts in compose.yaml.
These lines in the compose.yaml:
    extra_hosts:
      - "test1.com:192.168.1.88"
      - "www.test1.com:192.168.1.88"
add the lines
192.168.1.88    www.test1.com
192.168.1.88    test1.com
to the file /etc/hosts inside the Docker container.
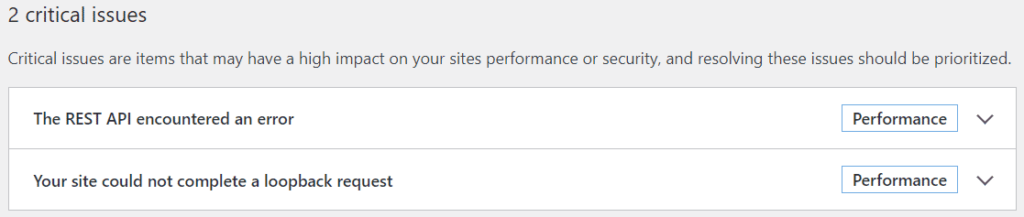
Without this, the Docker container will not know about our local test hosts test1.com and www.test1.com. And, in this case, if you log in to your WordPress site admin panel and go to: Tools > Site Health
, you’ll see 2 critical issues:
- The REST API encountered an error
- Your site could not complete a loopback request
For example, without extra_hosts, I had problems when installing themes and site templates of such well-known themes as Astra and Neve locally. But with this directive, I deployed these themes and their site templates without any problems.
With the directive extra_hosts, those issues will not exist.
Please notice: The same lines were added to these 2 files hosts:
- on the host machine — manually (see section 3.1)
- inside the Docker container — by the directive
extra_hostsin the filecompose.yaml(see section 3.2)
4. How to Reinstall WordPress in the Docker Container?
To reinstall WordPress in the Docker container (to get the clean WordPress installation again), on your Linux virtual machine:
1. Stop the containers:
cd /opt/projects/test1/
docker compose down
2. Delete the directory /opt/projects/test1/www:
rm -rf /opt/projects/test1/www
3. Delete /opt/projects_local/test1
rm -rf /opt/projects_local/test1
4. Start the containers again:
cd /opt/projects/test1/
docker compose up -d
You’ll get a clean installation of WordPress. Up and running.
5. Steps For Creating a Complete Development Environment
- Install Oracle VirtualBox
- Create an Ubuntu Virtual Machine
- Configure the network:
- on the NAT Adapter + Host-only Adapter
Configure a Static IP for the virtual machine
Make changes to the file hosts
or - on the Bridged Adapter
Configure a Static IP for the virtual machine
Make changes to the file hosts
- on the NAT Adapter + Host-only Adapter
- Install Guest Additions and share the project directory to the virtual machine.
I share the whole directory where all my test WordPress projects are located.
With thecompose.yamlabove, it is/opt/projects/ - Install Docker
- Deploy WordPress and run the Docker container as described in section 1
You can also download the test project from GitHub - Optional: do additional configuration as described in section 2
- Optional: If necessary to reinstall WordPress: follow the steps in section 4
If you need WordPress with XDebug on Docker, please check this article on WordPress with Xdebug. If you need to add a PHP extension to the WordPress image, please see this.
Do not use these steps on production. For production, you would need a more secure configuration. You would also probably use multiple Docker Compose files. And you would probably want to have Nginx as a reverse proxy.
6. How to Check Themes and Plugins
Before deploying a new theme or a plugin to production, I deploy it locally and check the following:
- Have the plugin Query Monitor installed and active — both when installing and when running a new theme or a plugin.
You’ll see which database queries run both during the plugin installation and its operation.
If the plugin has low performance, I’d think twice before using it.
If you have a Windows host machine and your Docker containers are on a VirtualBox virtual machine, you could have a problem creating a symlink required by the plugin. In this case, please see this article for a solution. - See user reviews and opinions.
If it had security problems, even in the past, I’d avoid using it.
First, you can check on wordpress.org. Then you can Google for “<plugin name> reviews and opinions”. If, for a paid plugin, you Google for “reviews” only, you may find a lot of affiliate sites telling you good things only. - Check the code is safe.
I browse through the code manually. If the plugin or a theme was written by a newbie programmer, often it could be seen very easily. Also, I check for usingeval(),preg_replace()with the e-modifier, check if I can find DB queries vulnerable for SQL injections, etc. If I see any problems, I’ll not use the plugin. - Check which modifications were made to the database structure.
If I stop using the plugin later on, I would not like to have a mess left in my database.
7. MySQL in Docker
This section is very optional. Still, I hope, you might possibly find it useful.
7.1. MySQL Volume in compose.yaml
If you work on a Windows computer and have an Ubuntu virtual machine, when you share a project folder to the virtual machine using Guest Additions, you would probably share it under the user and group www-data as described here.
If you try to create a volume for /var/lib/mysql inside this project folder, the MySQL Docker container will be restarting endlessly.
The simplest solution is to create a MySQL volume in a directory that is not shared with the Windows host machine.
In compose.yaml above, we used the directory /opt/projects_local/test1/mysql on the Ubuntu virtual machine for it.
In this case, MySQL files are accessible on the virtual machine. And since the volume directory is not shared with the Windows host machine, there is no problem with the owner or group of the MySQL files.
For more details, please see this explanation.
7.2. How to Load a MySQL Database Dump in Docker?
Normally I do not do this. But sometimes it is useful.
Sometimes you need to load a database dump into the MySQL database in Docker.
We added the named volume to the compose.yaml above:
      # To load a mysql dump (anyname.sql.gz):
      - /opt/projects/test1/docker-entrypoint-initdb.d:/docker-entrypoint-initdb.d
To load the database dump into the MySQL database:
- Destroy the MySQL Docker container.
- Delete the database files containing our WordPress MySQL database
test1.
In our case, delete the directory/opt/projects_local/test1/. It will delete all the MySQL database files in the MySQL volume. - Place a file with the database dump in the folder
/opt/projects/test1/docker-entrypoint-initdb.don the Linux machine.
It could be a file with any name and with the extensionsqlorsql.gz. - Start the MySQL Docker container again.
When the MySQL container starts for the first time, the database dump will be loaded to the database.
If you do not have any database dumps, keeping this named Docker volume would not hurt. So, you could keep the volume. And use it only when necessary.
Please see the official MySQL Docker image documentation for more details.
Conclusion
Using the process above, I usually have several WordPress installations locally. To be able to test different themes and plugins for security, performance, and convenience of use.
I would be very glad if you shared your opinions on how you test different WordPress solutions in your dev environment before you deploy them on production.
I am always happy to see new comments.